

In February 2026, ByteDance dropped Seedance 2.0. Within 24 hours it was everywhere, because a filmmaker generated a Hollywood-quality fight scene with a two-line prompt. The Deadpool screenwriter saw it and publicly posted that it was likely over for screenwriters. Elon Musk replied. The Motion Picture Association issued a formal statement the same day. ByteDance pulled the ability to generate real celebrity likenesses, tightened the guardrails, and the internet held its breath wondering if the model had been gutted in the process.
It wasn't. The underlying capability, the action, the physics, the motion, the emotional performance, all survived intact. And honestly, those conversations need to happen. Generative AI is moving faster than any legal framework can keep up with, and how the industry handles that matters. But that is a different video. What we can tell you is that Seedance 2.0 is the most capable video model on the market right now, and it is live on OpenArt.
Ermin Monzon, our Head of Content Media & Education, broke down why the model matters technically. Our in-house creator Bob stress-tested every reference type he could think of. And our collaborator Mia Meow built a 10-tip workflow guide from weeks of testing. This Handbook pulls the strongest material from all three to give you one complete picture.
What Seedance 2.0 can do → Ermin's overview
Before we get into workflow tips, it is worth understanding why this model is generating the reaction it is. Ermin walked through a series of demos that show where Seedance 2.0 pulls away from everything else on the market.
The fight scene that broke the internet is the obvious headline, but the demo that surprised Ermin more was a dancer with neon light trails sweeping around them in orbital arcs. It looks like a Nike commercial or a music video with a serious production budget. The reason this is technically significant is that the light trails are not composited over the dancer. The model generated both simultaneously. The motion and the effect interact with each other: the trails bend around the dancer's body, and the lighting from the trails actually reflects on the floor beneath them. That is called coherent VFX generation. The model understands that light behaves physically. It does not just paint glowing lines on top of video. For anyone doing music video content, UGC ads, or anything with a visual effects component, this is where Seedance 2.0 stands apart.
Another demo worth watching: a skier launching off a mountain with an alpine range filling the background. The physics of the snow spray, the body rotation, the landing. All generated, all physically plausible. The model handles action and motion at a level that no other publicly available tool is matching right now.
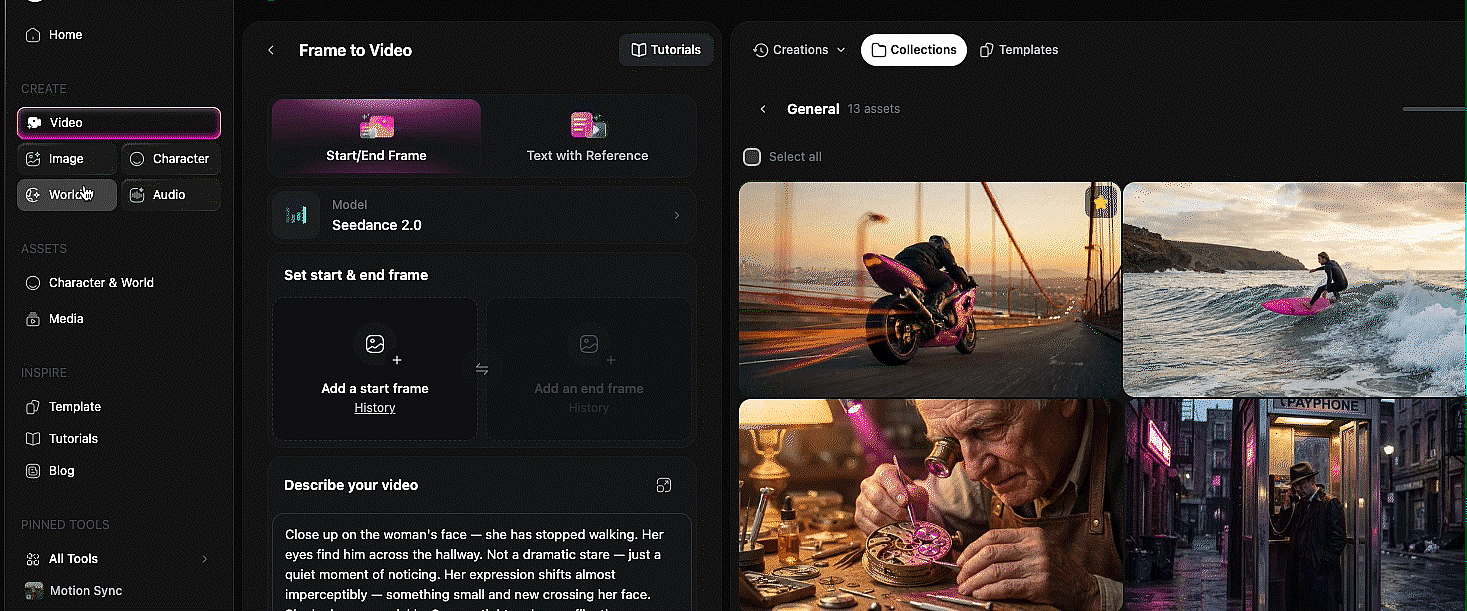
Text-to-video: the single-take prompt structure → 0:50 in Mia's video
Everything you hear in Mia's text-to-video demos, the audio, the ambient sound, was generated at the same time as the video. One prompt, one take. Other models struggle to hold this many details in a single generation. Seedance 2.0 actually follows what you give it.
Mia's prompt structure for single-take shots is straightforward. Start with "continuous single take" and your camera actions. Then describe what the camera sees as it moves. End with control and style keywords: no cuts, seamless transition, cinematic, high definition. That formula alone will get you strong results.
For more complex scenes, like a fight sequence at 2:13, Mia recommends starting with a clear beginning and end state. Describe the fight scene, describe how it ends (everyone on the ground, for example), and let the model fill the middle. She also found that describing specific camera angles creates a more cinematic feel, and adding a film genre reference to the end of the prompt helps set the visual tone. One thing she discovered through iteration: if you describe your characters physically in the prompt rather than leaving it vague, the model does a better job designing the scene and keeping characters visually distinct.
Mia's key insight on prompting: the model is well-trained on film language. Terms like "tracking shot," "crane shot," "whip pan," and genre cues like "gritty war film" or "neo-noir thriller" go a long way.
Mia's full tutorial covers all 10 of her workflow tips, including the ones we've distilled throughout this Handbook. Watch it alongside or come back to it later.
The reference system: tagging images, video, and audio into your prompt → 4:27 in Mia's video · → Bob's reference deep-dive
This is the core mechanic that powers everything else in Seedance 2.0 on OpenArt, and once you understand it, every section that follows will make more sense.
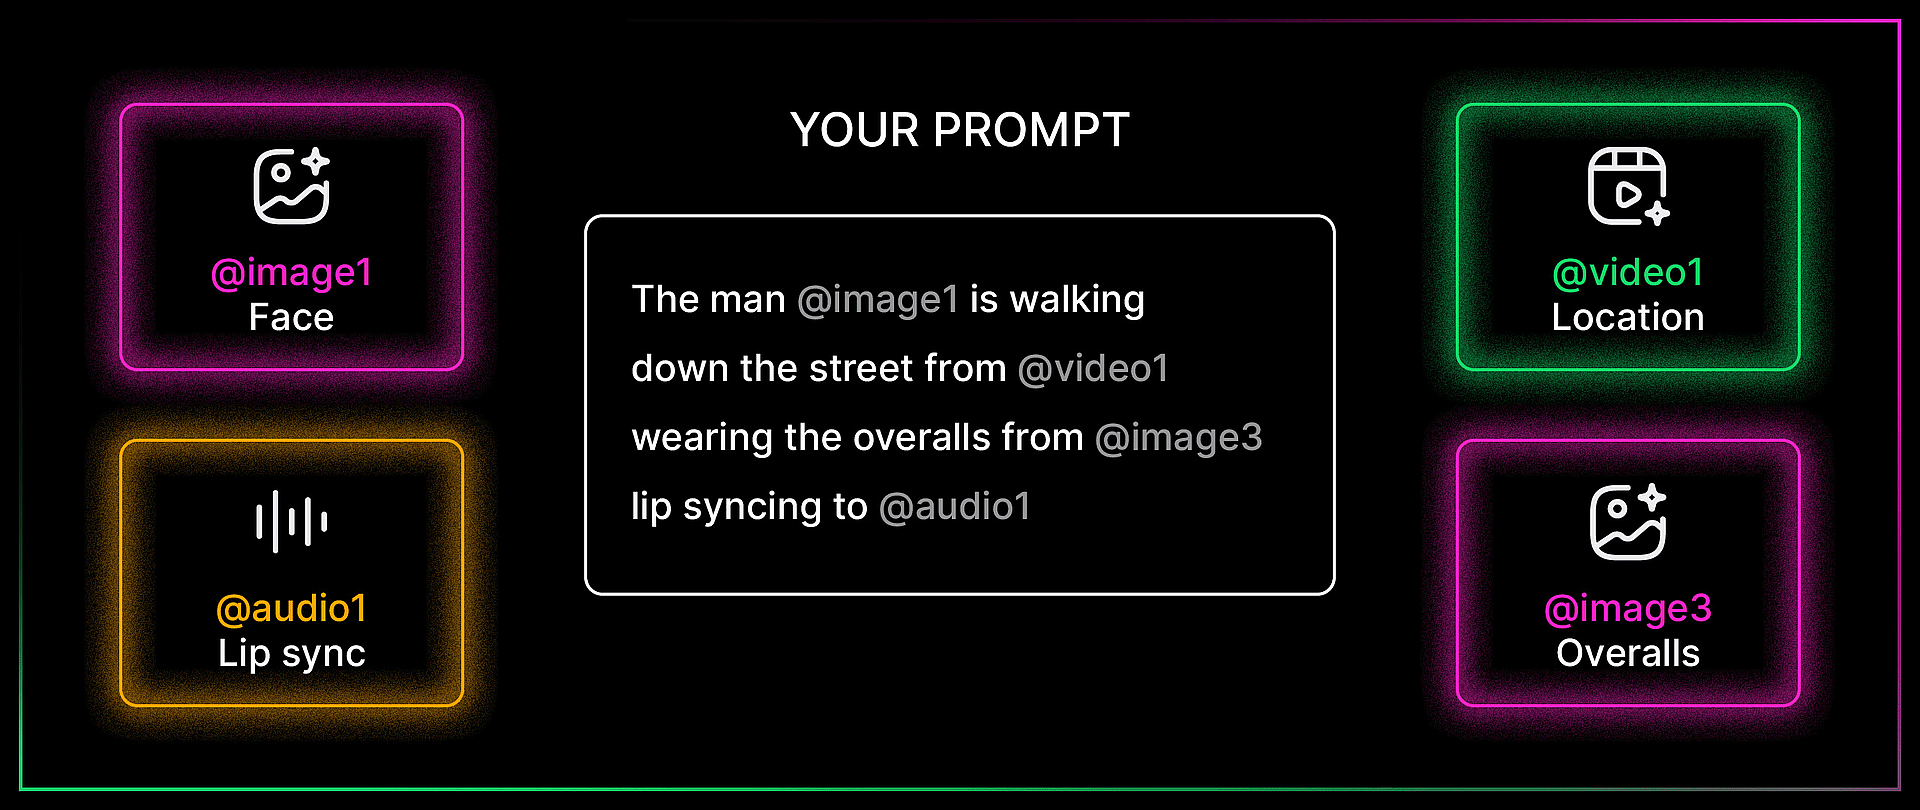
The idea is simple: you can upload images, videos, and audio files as references, then tag them directly inside your text prompt using the @ symbol. Type @ and you get to choose which uploaded file you want to reference. From there, you tell the model exactly what to do with each one. Use the face from image one. Use the camera movement from video one. Lip sync to audio one. The model reads your prompt, looks at the tagged files, and combines everything into a single generation.
Mia's multimodal walkthrough at 4:27 is the cleanest explainer of how this works. She uploaded a dance video, two character images, and a song, then told the model to use the video as a camera motion reference, image one as the left dancer, image two as the right dancer, and the audio as the background music. All tagged with @, all in one prompt.
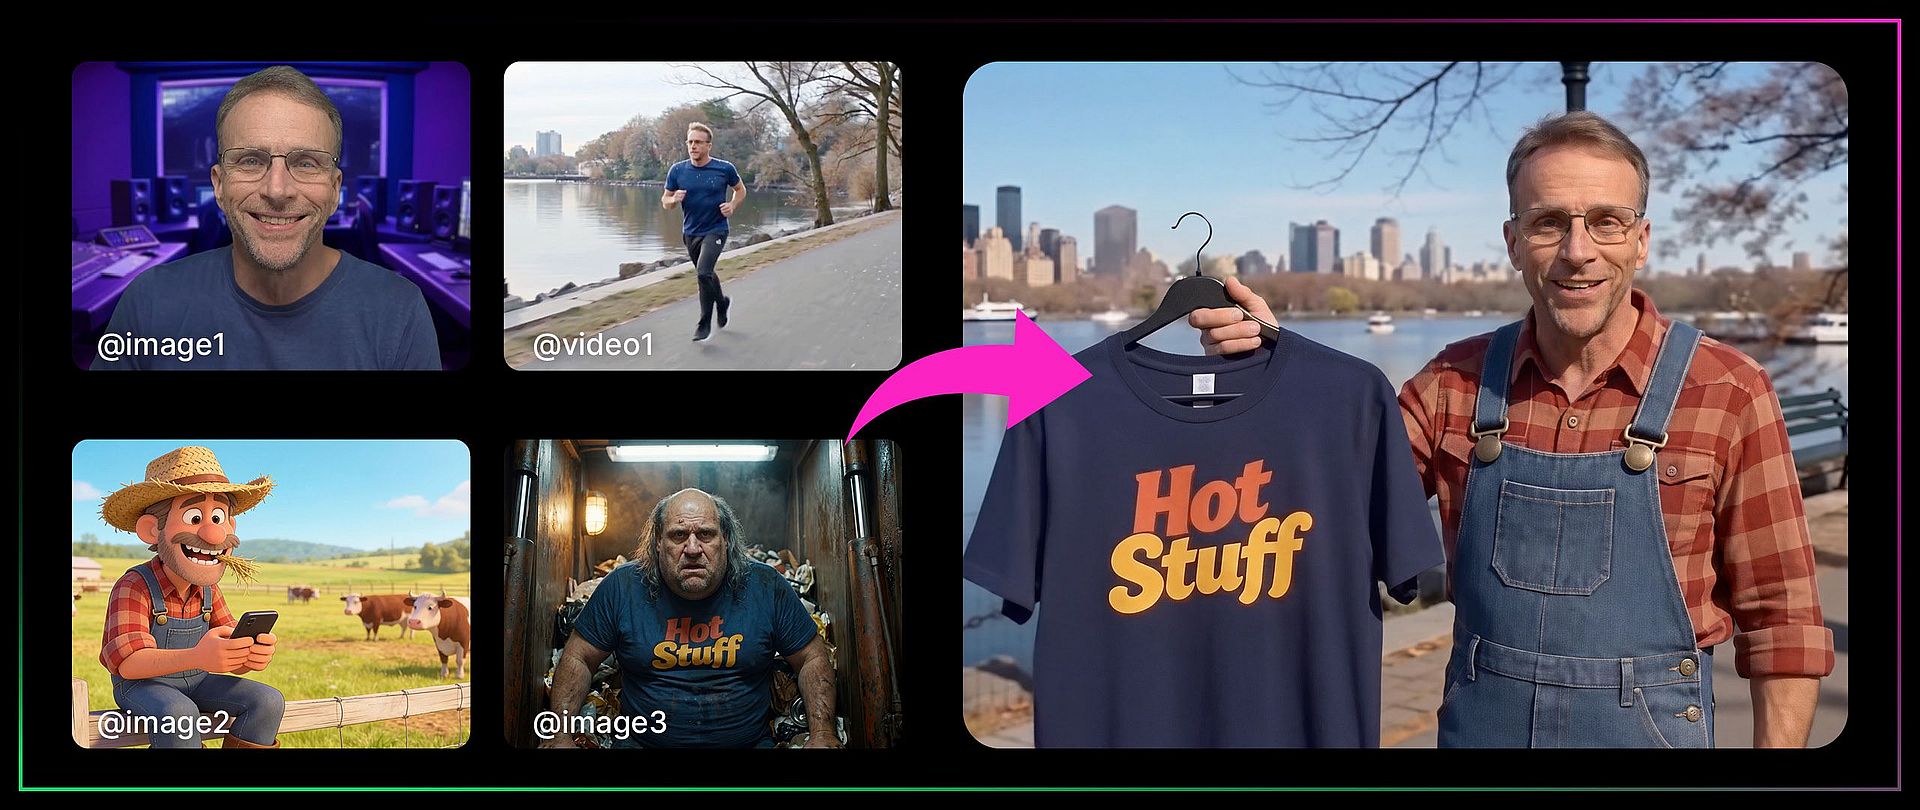
Bob pushed this further. In one of his demos, he referenced four different files in a single prompt: the face from image one, the overalls from image three, the shirt from image four, and a location from a reference video. The prompt was: the man in image one is walking down the street from the video wearing the overalls from image three and carrying the shirt from image four, talking to the camera. The model held consistency across every element. That is a remarkable amount of compositing happening from a single text prompt.
A few things both creators learned about how references behave:
If your reference video has audio and you also tag a separate audio file, the model tends to favor the video's existing audio over your uploaded track. Mia's workaround: upload the video without audio if you want your own music or voiceover to take priority.
References are not limited to concrete elements. You can also point to a video and say "I just want it to look like this" without copying anything else. Bob used this to transfer a visual style (fisheye lens, flickering light) from one video to an entirely new scene.
You do not have to use all reference types at once. A single character image in a text prompt is a perfectly valid use of the system. The power scales with how many elements you layer in, but it works fine at every level of complexity.
Lip sync, voice, and performance → 7:57 in Mia's video · → Bob's audio deep-dive
Bob's full video covers references across images, audio, and video in depth. The lip sync and voice cloning sections are where it really shines.
This is the section with the most tips from the most creators, and for good reason. Seedance 2.0's audio capabilities are the feature that separates it from everything else on the market right now.
Bob's transcript trick
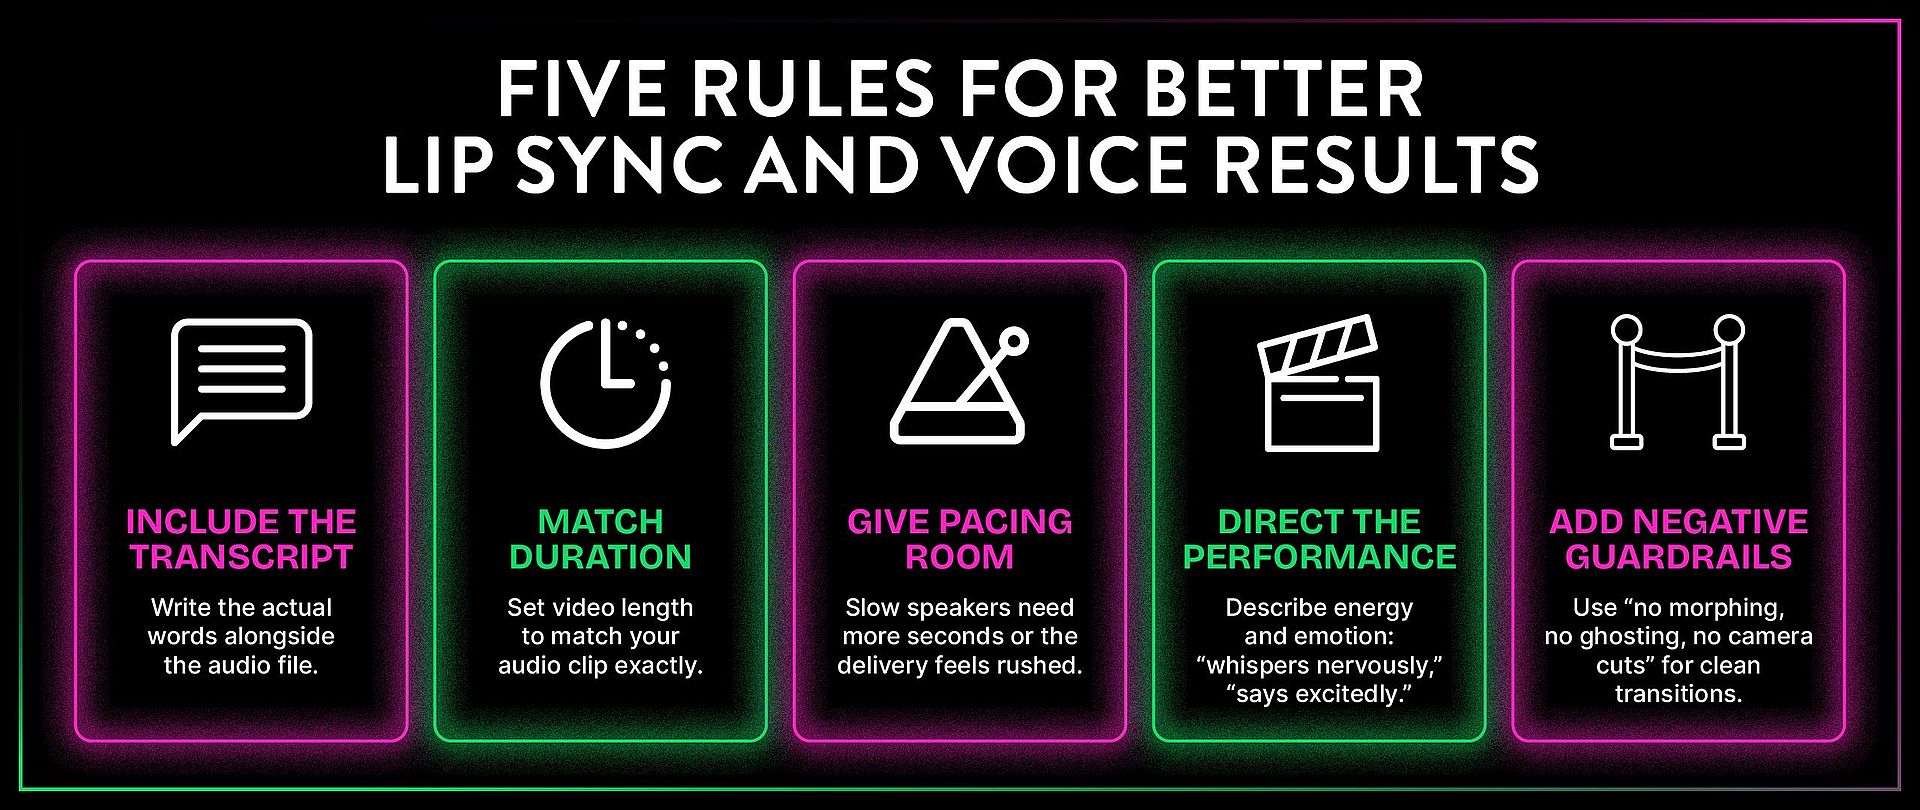
This is the single most useful tip across all three videos. When you are doing lip sync with an audio reference, include the actual transcript of the words in your prompt alongside the audio file. Here is why.
Bob tested this with a clip of himself talking to camera. In his first attempt, he tagged the audio file and described the scene but did not include the exact words being spoken. The model listened to the audio and tried to replicate it, but got details wrong ("CGI 2.0" instead of "Seedance 2.0"). When he modified the prompt to explicitly spell out the words being said, the audio file combined with the written transcript produced dramatically better results. The lip sync was tighter, the words were accurate, and the overall performance was more convincing.
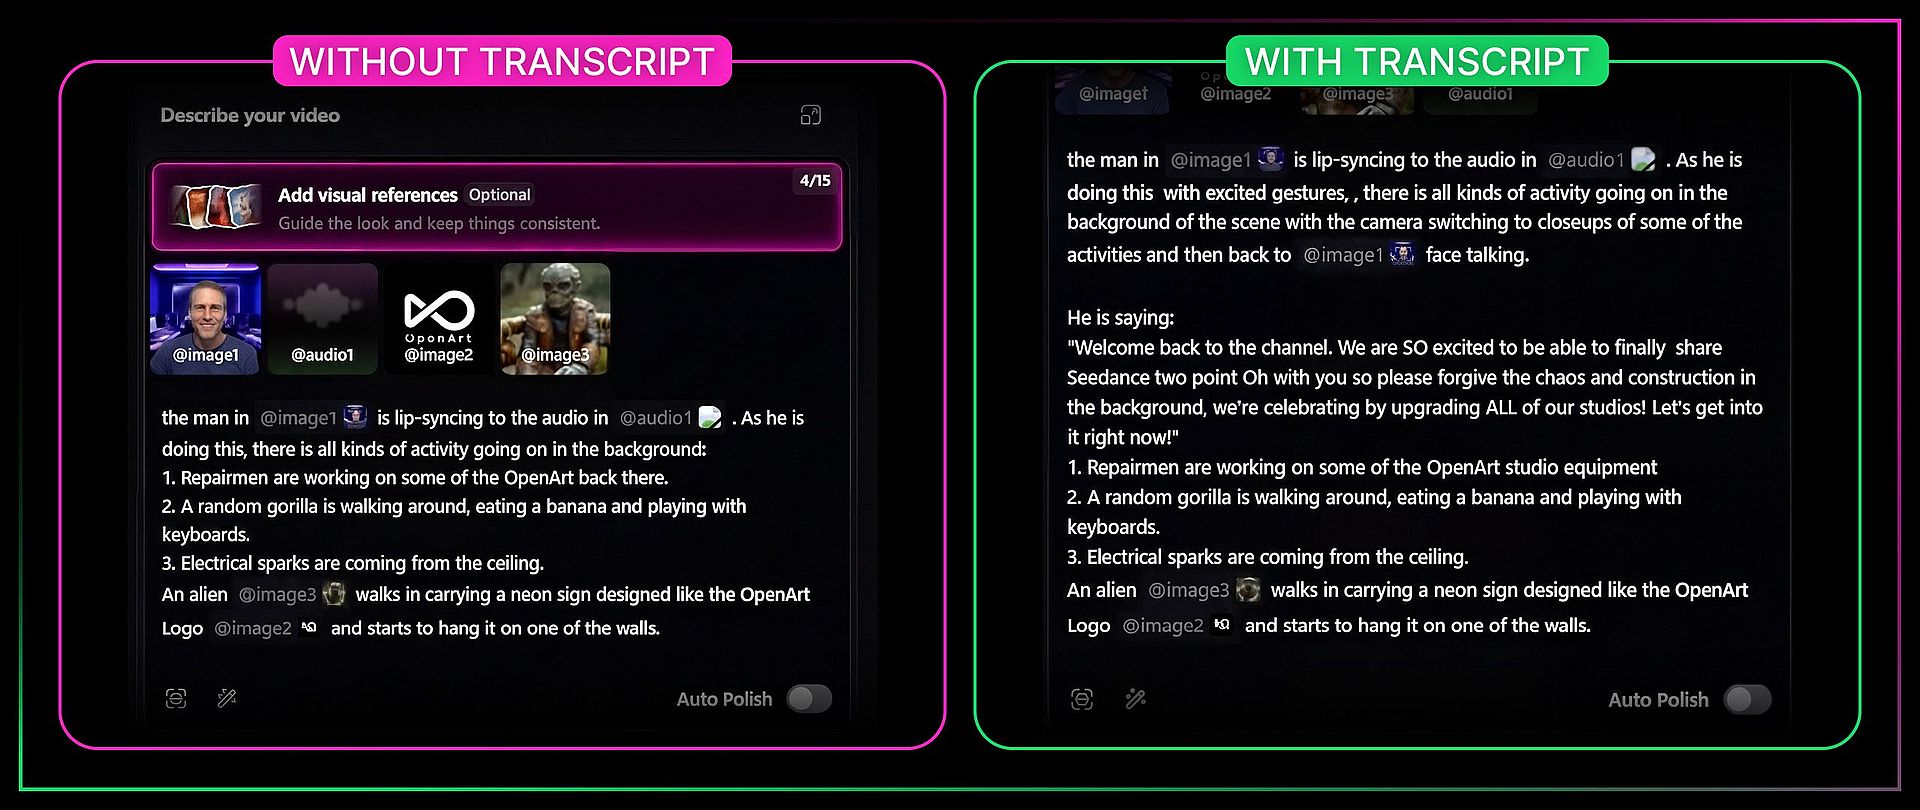
The takeaway: anytime you are doing lip sync, provide the actual transcript along with the audio file. You are almost guaranteed to get a better result.
Match your audio duration to your video duration
Mia learned this the hard way. If your audio reference is 11 seconds and you set the video to 15 seconds, the model is forced to stretch or compress the audio to fit, and you are almost guaranteed to lose the timing. Always match your duration setting to the actual length of your audio file.
Voice cloning
Bob demonstrated voice cloning with a 15-second clip of Ermin's voice (Uncle Monz around the OpenArt office). The setup: record about 15 seconds of a voice in a way that captures the qualities you want duplicated. Tag that audio as a voice reference rather than a lip sync source. Then write the actual dialogue in the prompt, and the model generates new speech in that voice.
The first attempt was too fast for Ermin's natural cadence. Bob gave the model a full 14 seconds instead of 9 and the result sounded dramatically more like Ermin actually would talk. The lesson: pacing matters as much as the voice sample. Give the model enough time to deliver the words at the right speed for that voice.
You can reuse the same voice reference across multiple videos to keep vocal consistency for a character.
Mia's performance directing tips → 12:20 in Mia's video
Mia found that you can direct the emotional performance and energy of a character through the prompt itself. The words you write influence how the character delivers the dialogue, not just what they say. If you write "he says it excitedly," the character's body language and vocal energy shift. If you write "she whispers nervously," the whole performance changes.
This also applies to multiple characters in the same scene. At 11:10 in Mia's video, she demonstrates giving two characters different vocal personalities and emotional states in one prompt, and the model keeps them distinct.
Mia's negative guardrail tip
When you want clean scene-to-scene transitions with no morphing between them (for example, narrating across four different images), Mia learned to add negative guardrails to the prompt: "no morphing, no ghosting, no camera cuts." Without these, the model sometimes blends scenes together in ways that look like visual glitches. With the guardrails, you get crisp transitions from one scene to the next.
Advanced references: motion, storyboards, and style → 13:22 in Mia's video · → Bob's video references
Once you understand how the reference system works for faces and voices, here is what else you can point it at.
Motion and camera transfer
If you have a shot where you like the way the camera moves, you can transfer that camera motion to an entirely new scene. Bob demonstrated this with a video of a dog jumping up and down as the camera dollied around it. He brought in that video as a reference and said "use that video as a reference for the camera and character movement to guide a scarecrow jumping on a trampoline." The result transferred both the camera dolly and the jumping action to the new character and scene.
He also showed motion transfer with real footage. Using a clip of Emily running at 19:15, he said "replace the woman in video one with the man in image one and it is snowing." The model swapped the character, added winter weather, and kept the running motion intact. Some background details changed (the overall atmosphere shifted to gray and wintry), but the core motion held.
Character Swap Split Screen LRB.mp4
Storyboard to video → 13:22 in Mia's video
You can upload a comic-panel style grid or storyboard and the model will attempt to animate through it panel by panel. Mia tested this with a hand-drawn grid and found that the model followed the panels in order, but the directional logic between panels was not always obvious to the model from the visuals alone.
Two tips that made this work better. First, describe the narrative logic between panels in your prompt. The model needs to understand the story progression, not just the visual sequence. Second, if your storyboard has text or captions on it, add "text overlay no captions on screen" to the prompt to prevent text from bleeding into the generated video.
Mia also notes that you can use actual comic book pages for this, but be careful with anything involving existing IP.
Style references and template replication → 14:45 in Mia's video
Mia's template replication tip is a practical one for anyone producing content at volume. If you have a video with a visual style you like, you can reference it and tell the model to replicate just the style, not the content. She tested this by pointing to a video and saying she only wanted the fisheye lens effect and the flickering double-exposure look, then combined it with character images and outfit references to create a fashion sequence. The model picked up the abstract visual qualities without copying the specific content of the reference video.
This is useful for maintaining a consistent visual identity across a series of videos. Create one video you like, then reference its style for every subsequent generation.
Post-generation: extend and edit → 16:06 in Mia's video
A video is not done once it is generated. Seedance 2.0 lets you extend, edit, and rewrite after the fact.
Extend. Upload a video you want to continue, choose extend forward (or backward), specify how many seconds, adjust your duration setting to match, and describe what you want to happen in the new portion. Mia extended a video forward by 10 seconds, then extended it backward by 10 seconds and combined them into a seamless scene longer than the 15-second generation cap. That is a real unlock. The 15-second limit used to be a hard ceiling. You can now keep building longer seamless scenes without cuts.
Edit. If you want to change something that already happened in a generated video, you can talk to the model about the existing video and tell it what to alter. This works similarly to the video-to-video editing in Wan 2.7 but with Seedance 2.0's stronger understanding of what is in the scene.
The bottom line
Seedance 2.0 is the most capable video model available on OpenArt right now, and the reference system is the reason to pay attention. The ability to tag images, video, and audio into a single prompt and have the model hold consistency across all of them is not something any other model is doing at this level. The lip sync is strong. The voice cloning works. The motion transfer is clean. The coherent VFX generation, where lighting and effects actually interact with the scene physically, is new territory entirely.
Three creators, three videos, one consistent takeaway: this model listens. It follows complex, multi-element prompts better than anything else out there. The best thing you can do is get in there and start asking it for what you want, because it has an amazing imagination. Bob's words, and he's right.