

 ChatGPT
 Perplexity
 Claude
 Gemini
In February 2026, ByteDance dropped Seedance 2.0. Within 24 hours it was everywhere, because a filmmaker generated a Hollywood-quality fight scene with a two-line prompt. The Deadpool screenwriter saw it and publicly posted that it was likely over for screenwriters. Elon Musk replied. The Motion Picture Association issued a formal statement the same day. ByteDance pulled the ability to generate real celebrity likenesses, tightened the guardrails, and the internet held its breath wondering if the model had been gutted in the process.
No lo era. La capacidad subyacente, la acción, la física, el movimiento, la interpretación emocional, todo sobrevivió intacto. Y sinceramente, esas conversaciones tienen que producirse. La IA generativa avanza más rápido de lo que cualquier marco legal puede seguir, y cómo lo gestione la industria importa. Pero ese es otro vídeo. Lo que sí podemos decirte es que Seedance 2.0 es el modelo de vídeo más capaz del mercado ahora mismo, y ya está disponible en OpenArt.
Ermin Monzon, nuestro responsable de Contenidos, Medios y Educación, explicó por qué el modelo importa a nivel técnico. Nuestro creador interno Bob puso a prueba todos los tipos de referencia que se le ocurrieron. Y nuestra colaboradora Mia Meow creó una guía de flujo de trabajo con 10 consejos tras semanas de pruebas. Este manual reúne lo mejor de los tres para darte una visión completa.
Lo que Seedance 2.0 puede hacer → Resumen de Ermin
Antes de entrar en consejos de flujo de trabajo, conviene entender por qué este modelo está generando la reacción que provoca. Ermin repasó una serie de demos que muestran dónde Seedance 2.0 se despega de todo lo demás en el mercado.
The fight scene that broke the internet is the obvious headline, but the demo that surprised Ermin more was a dancer with neon light trails sweeping around them in orbital arcs. It looks like a Nike commercial or a music video with a serious production budget. The reason this is technically significant is that the light trails are not composited over the dancer. The model generated both simultaneously. The motion and the effect interact with each other: the trails bend around the dancer's body, and the lighting from the trails actually reflects on the floor beneath them. That is called coherent VFX generation. The model understands that light behaves physically. It does not just paint glowing lines on top of video. For anyone doing music video content, UGC ads, or anything with a visual effects component, this is where Seedance 2.0 stands apart.
Otra demo que merece la pena ver: un esquiador saltando desde una montaña con una cordillera alpina llenando el fondo. La física del polvo de nieve, la rotación del cuerpo, el aterrizaje. Todo generado, todo físicamente plausible. El modelo maneja la acción y el movimiento a un nivel que ninguna otra herramienta disponible al público iguala ahora mismo.
Texto a vídeo: la estructura de prompt de toma única → 0:50 en el vídeo de Mia
Todo lo que oyes en las demos de texto a vídeo de Mia (el audio, el sonido ambiente) se generó al mismo tiempo que el vídeo. Un prompt, una toma. Otros modelos tienen dificultades para retener tantos detalles en una sola generación. Seedance 2.0 realmente sigue lo que le das.
La estructura de prompt de Mia para tomas de un solo plano es sencilla. Empieza con "toma continua de un solo plano" y las acciones de tu cámara. Luego describe lo que ve la cámara mientras se mueve. Termina con palabras clave de control y estilo: sin cortes, transición fluida, cinematográfico, alta definición. Solo con esa fórmula obtendrás resultados potentes.
Para escenas más complejas, como un secuencia de pelea en el 2:13, Mia recommends starting with a clear beginning and end state. Describe the fight scene, describe how it ends (everyone on the ground, for example), and let the model fill the middle. She also found that describing specific camera angles creates a more cinematic feel, and adding a film genre reference to the end of the prompt helps set the visual tone. One thing she discovered through iteration: if you describe your characters physically in the prompt rather than leaving it vague, the model does a better job designing the scene and keeping characters visually distinct.
La clave de Mia sobre los prompts: el modelo está bien entrenado en lenguaje cinematográfico. Términos como «tracking shot», «crane shot», «whip pan» y referencias de género como «gritty war film» o «neo-noir thriller» marcan una gran diferencia.
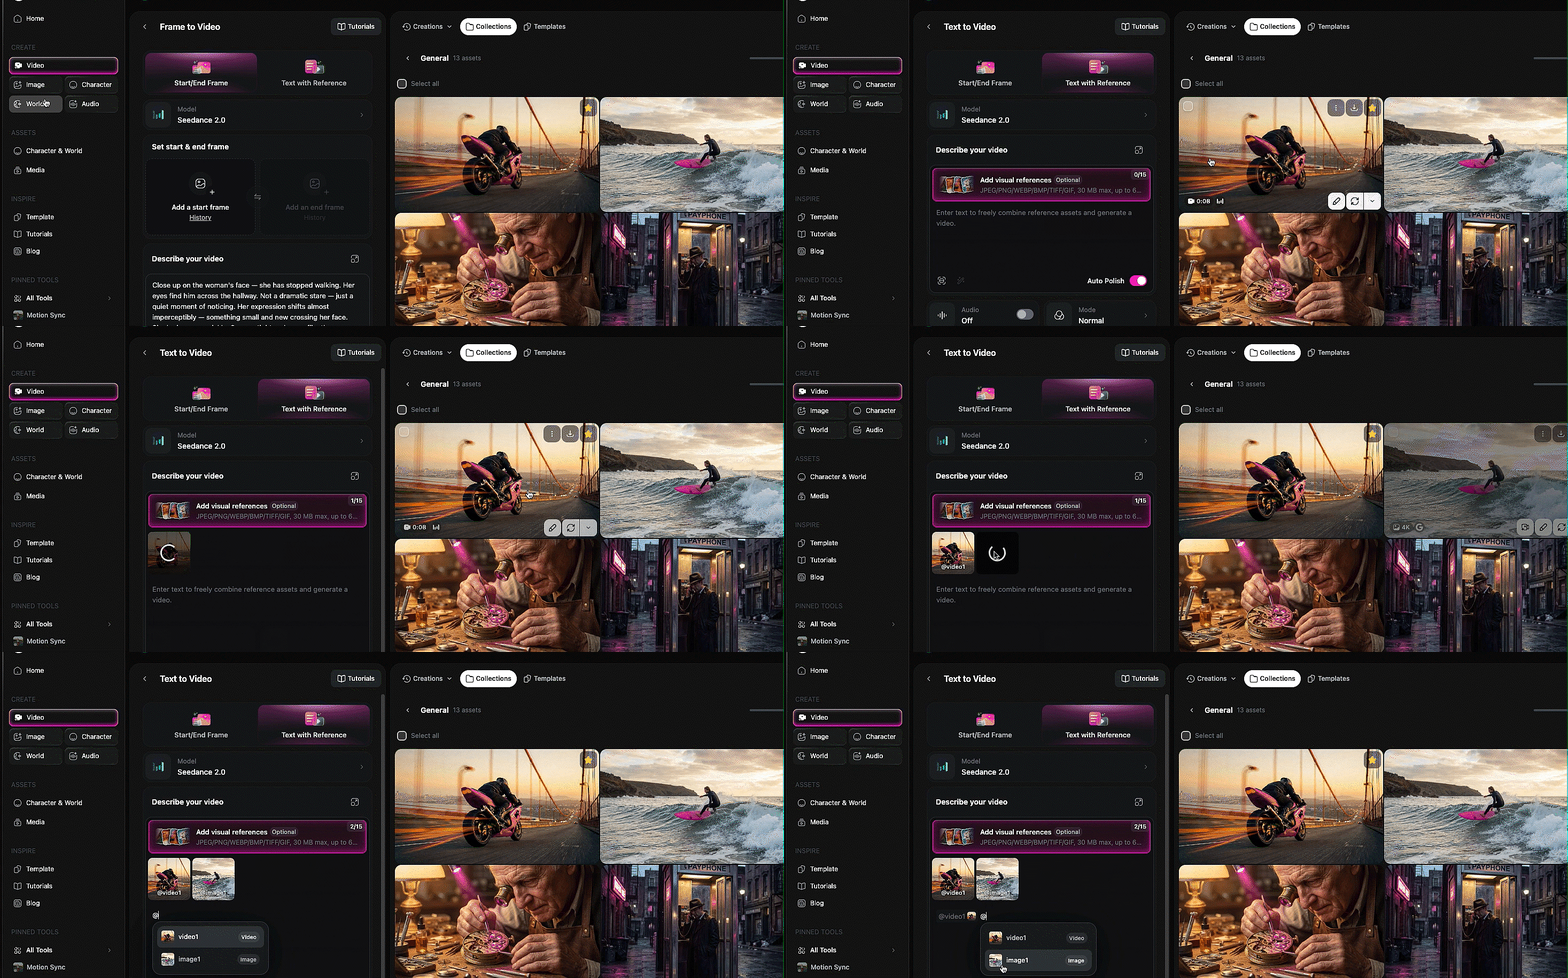
El tutorial completo de Mia recoge sus 10 trucos de flujo de trabajo, incluidos los que hemos destilado a lo largo de este manual. Míralo mientras avanzas o vuelve a él más tarde.
El sistema de referencias: etiquetar imágenes, vídeo y audio en tu prompt → 4:27 en el vídeo de Mia · → Análisis a fondo de las referencias de Bob
Esta es la mecánica central que impulsa todo lo demás en Seedance 2.0 en OpenArt, y una vez que la entiendas, cada sección que sigue tendrá más sentido.
La idea es sencilla: puedes subir imágenes, vídeos y archivos de audio como referencias y luego etiquetarlos directamente en tu prompt de texto con el símbolo @. Escribe @ y elige qué archivo subido quieres referenciar. A partir de ahí, le dices al modelo exactamente qué hacer con cada uno. Usa la cara de la imagen uno. Usa el movimiento de cámara del vídeo uno. Sincroniza los labios con el audio uno. El modelo lee tu prompt, mira los archivos etiquetados y combina todo en una sola generación.
de Mia tutorial multimodal en el minuto 4:27 es la explicación más clara de cómo funciona esto. Subió un vídeo de baile, dos imágenes de personajes y una canción, y luego le dijo al modelo que usara el vídeo como referencia de movimiento de cámara, la imagen uno como bailarina de la izquierda, la imagen dos como bailarina de la derecha y el audio como música de fondo. Todo etiquetado con @, todo en un solo prompt.
Bob pushed this further. In one of his demos, he referenced four different files in a single prompt: the face from image one, the overalls from image three, the shirt from image four, and a location from a reference video. The prompt was: the man in image one is walking down the street from the video wearing the overalls from image three and carrying the shirt from image four, talking to the camera. The model held consistency across every element. That is a remarkable amount of compositing happening from a single text prompt.
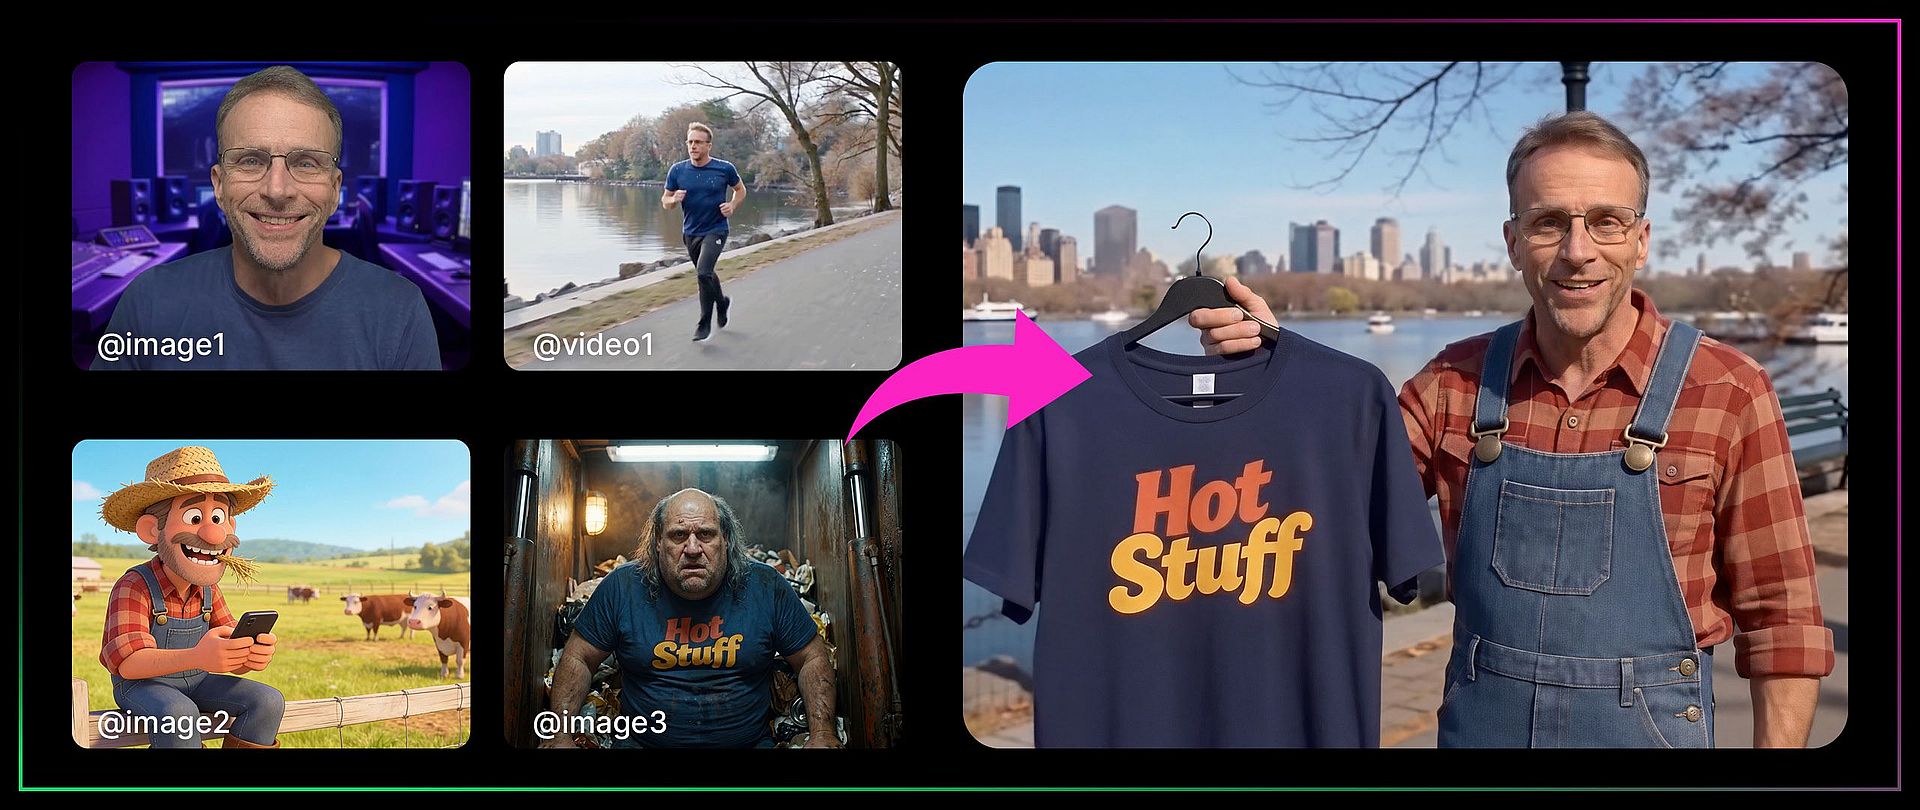
Algunas cosas que ambos creadores aprendieron sobre cómo se comportan las referencias:
Si tu vídeo de referencia tiene audio y además etiquetas un archivo de audio aparte, el modelo tiende a priorizar el audio original del vídeo por encima de la pista que subes. El truco de Mia: sube el vídeo sin audio si quieres que tu propia música o voz en off tenga prioridad.
Las referencias no se limitan a elementos concretos. También puedes señalar un vídeo y decir "solo quiero que se vea así" sin copiar nada más. Bob usó esto para transferir un estilo visual (lente ojo de pez, luz parpadeante) de un vídeo a una escena completamente nueva.
No tienes que usar todos los tipos de referencia a la vez. Una sola imagen de personaje en un prompt de texto es un uso perfectamente válido del sistema. La potencia aumenta según cuántos elementos superpongas, pero funciona bien en cualquier nivel de complejidad.
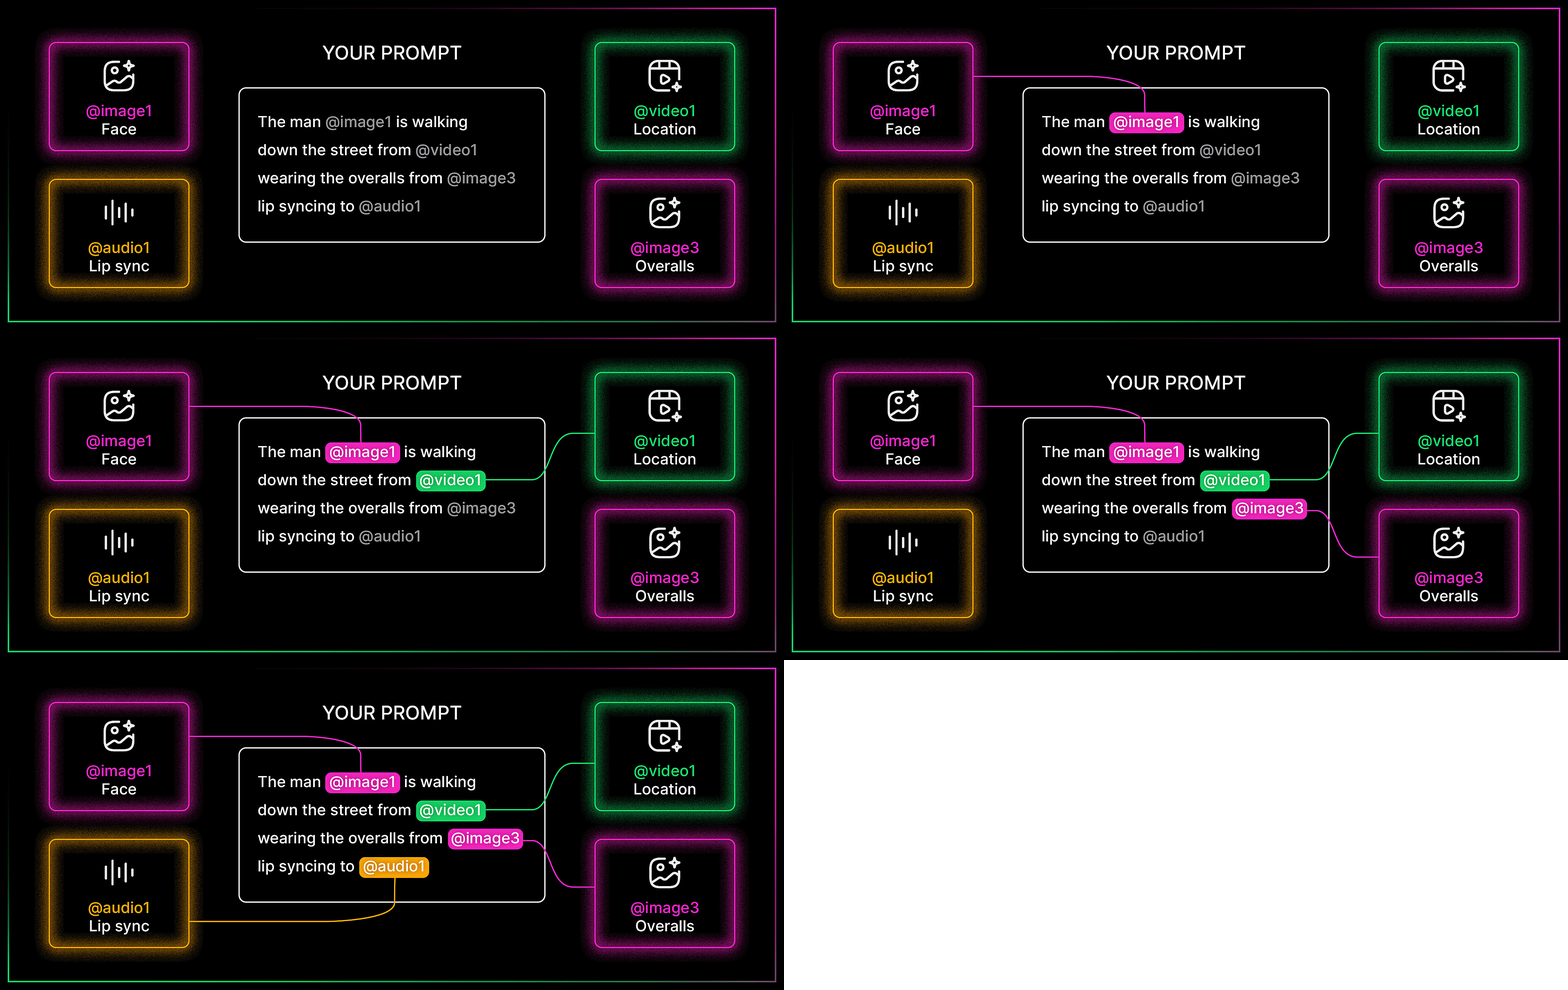
Sincronización labial, voz e interpretación → 7:57 en el vídeo de Mia · → Análisis a fondo del audio de Bob
El vídeo completo de Bob cubre en profundidad las referencias en imágenes, audio y vídeo. Las secciones de lip sync y clonación de voz son donde realmente brilla.
Esta es la sección con más consejos de más creadores, y con razón. Las capacidades de audio de Seedance 2.0 son la característica que lo distingue de todo lo demás en el mercado ahora mismo.
El truco de la transcripción de Bob
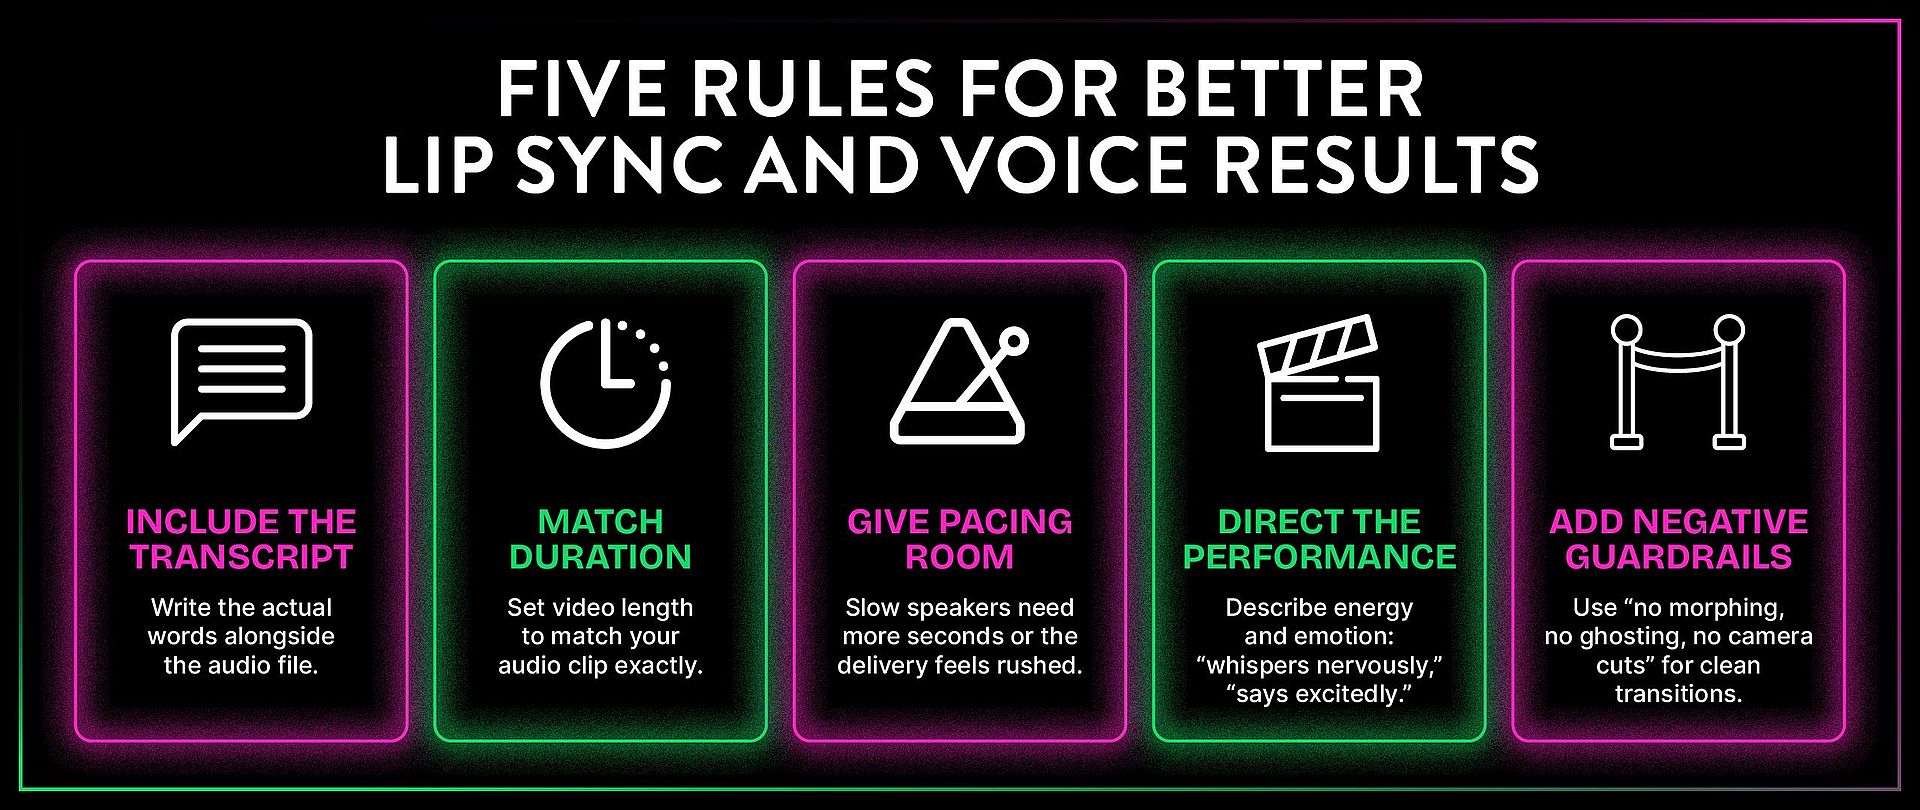
Este es el consejo más útil de los tres vídeos. Cuando hagas lip sync con una referencia de audio, incluye la transcripción real de las palabras en tu prompt junto al archivo de audio. Aquí tienes por qué.
Bob tested this with a clip of himself talking to camera. In his first attempt, he tagged the audio file and described the scene but did not include the exact words being spoken. The model listened to the audio and tried to replicate it, but got details wrong ("CGI 2.0" instead of "Seedance 2.0"). When he modified the prompt to explicitly spell out the words being said, the audio file combined with the written transcript produced dramatically better results. The lip sync was tighter, the words were accurate, and the overall performance was more convincing.
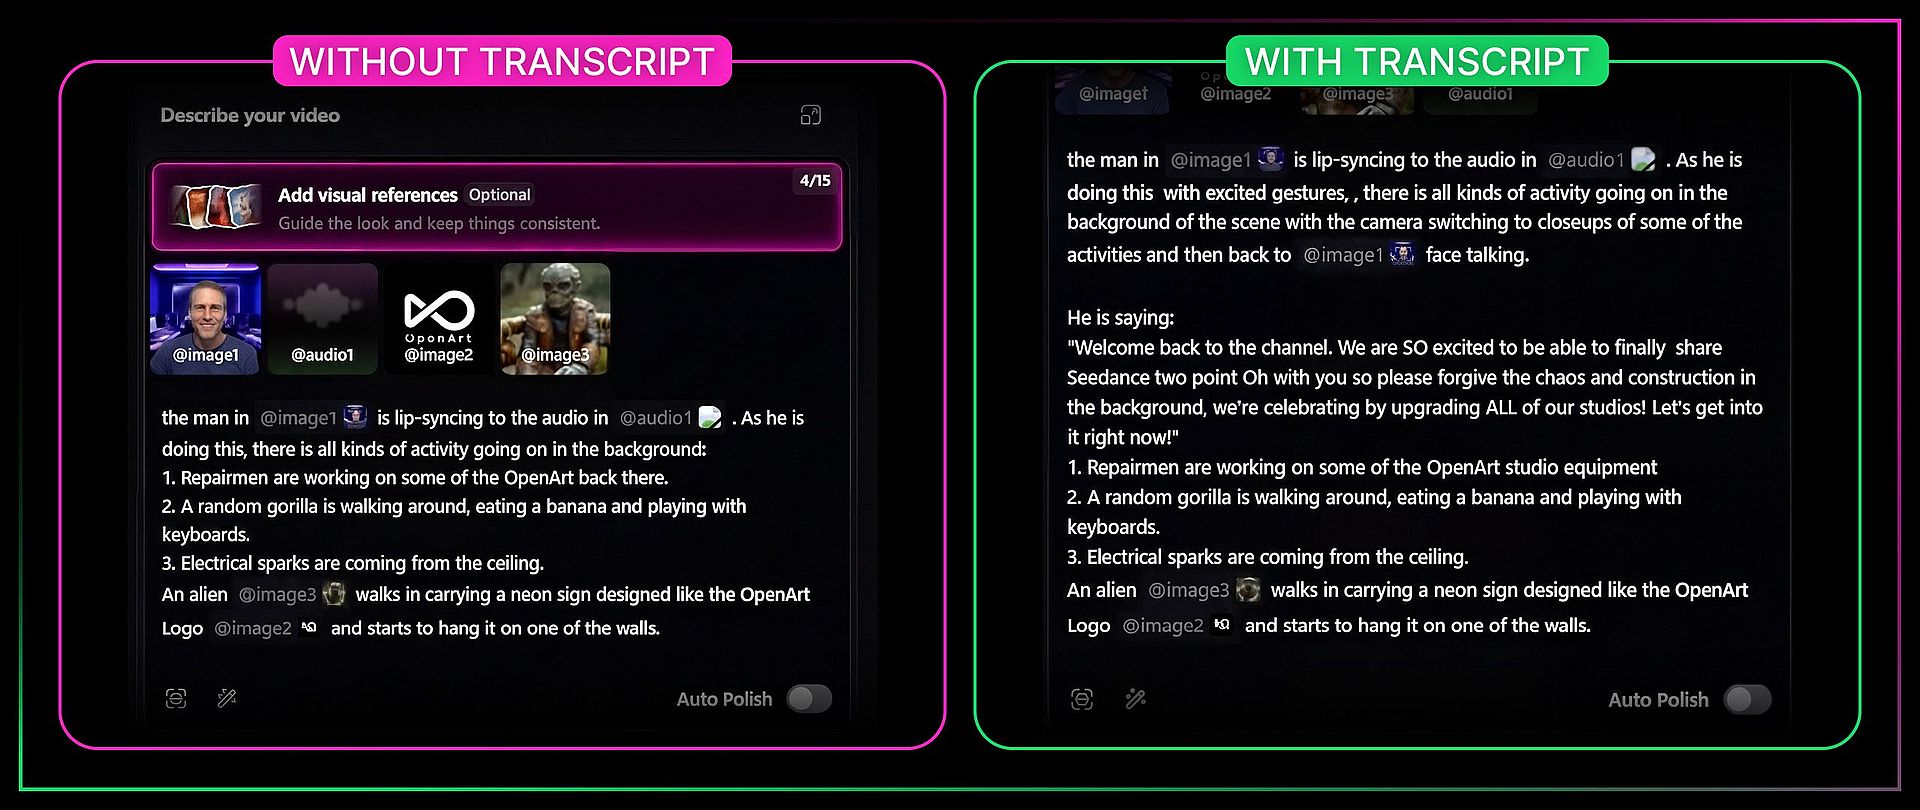
La clave: siempre que hagas lip sync, proporciona la transcripción real junto con el archivo de audio. Prácticamente tienes garantizado un mejor resultado.
Ajusta la duración de tu audio a la de tu vídeo
Mia lo aprendió por las malas. Si tu referencia de audio dura 11 segundos y ajustas el vídeo a 15 segundos, el modelo se ve obligado a estirar o comprimir el audio para que encaje, y es casi seguro que perderás la sincronización. Ajusta siempre la duración a la longitud real de tu archivo de audio.
Clonación de voz
Bob demostró la clonación de voz con un clip de 15 segundos de la voz de Ermin (el tío Monz de la oficina de OpenArt). La configuración: graba unos 15 segundos de una voz de forma que capture las cualidades que quieres duplicar. Etiqueta ese audio como referencia de voz en lugar de fuente de sincronización labial. Luego escribe el diálogo real en el prompt y el modelo genera un nuevo discurso con esa voz.
El primer intento fue demasiado rápido para la cadencia natural de Ermin. Bob le dio al modelo 14 segundos completos en lugar de 9 y el resultado sonaba muchísimo más parecido a cómo hablaría Ermin de verdad. La lección: el ritmo importa tanto como la muestra de voz. Dale al modelo suficiente tiempo para pronunciar las palabras a la velocidad adecuada para esa voz.
Puedes reutilizar la misma referencia de voz en varios vídeos para mantener la consistencia vocal de un personaje.
Consejos de Mia para dirigir la interpretación → 12:20 en el vídeo de Mia
Mia descubrió que puedes dirigir la interpretación emocional y la energía de un personaje a través del propio prompt. Las palabras que escribes influyen en cómo el personaje pronuncia el diálogo, no solo en lo que dice. Si escribes «lo dice con entusiasmo», el lenguaje corporal y la energía vocal del personaje cambian. Si escribes «susurra nerviosa», toda la interpretación cambia.
Esto también se aplica a varios personajes en la misma escena. En 11:10 en el vídeo de Mia, muestra cómo dar a dos personajes personalidades vocales y estados emocionales distintos en un mismo prompt, y el modelo los mantiene diferenciados.
Consejo de Mia sobre las restricciones negativas
Cuando quieres transiciones limpias de una escena a otra, sin morphing entre ellas (por ejemplo, narrando a través de cuatro imágenes distintas), Mia aprendió a añadir restricciones negativas al prompt: «sin morphing, sin ghosting, sin cortes de cámara». Sin esto, el modelo a veces mezcla las escenas de formas que parecen fallos visuales. Con estas restricciones, obtienes transiciones nítidas de una escena a la siguiente.
Referencias avanzadas: movimiento, storyboards y estilo → 13:22 en el vídeo de Mia · → Referencias de vídeo de Bob
Una vez que entiendas cómo funciona el sistema de referencias para caras y voces, aquí tienes qué más puedes usar como referencia.
Transferencia de movimiento y cámara
Si tienes una toma en la que te gusta cómo se mueve la cámara, puedes transferir ese movimiento de cámara a una escena completamente nueva. Bob lo demostró con un vídeo de un perro saltando mientras la cámara hacía un travelling a su alrededor. Usó ese vídeo como referencia y dijo «usa ese vídeo como referencia para el movimiento de la cámara y del personaje para guiar a un espantapájaros saltando en una cama elástica». El resultado transfirió tanto el travelling de la cámara como la acción de saltar al nuevo personaje y escena.
También mostró la transferencia de movimiento con material real. Usando un clip de Emily corriendo a las 19:15, dijo «reemplaza a la mujer del vídeo uno por el hombre de la imagen uno y que esté nevando». El modelo cambió el personaje, añadió clima invernal y mantuvo intacto el movimiento de carrera. Algunos detalles del fondo cambiaron (la atmósfera general pasó a ser gris e invernal), pero el movimiento principal se mantuvo.
Character Swap Split Screen LRB.mp4
Del storyboard al vídeo → 13:22 en el vídeo de Mia
Puedes subir una cuadrícula estilo viñetas de cómic o un storyboard y el modelo intentará animar viñeta a viñeta. Mia lo probó con una cuadrícula dibujada a mano y comprobó que el modelo seguía las viñetas en orden, pero la lógica direccional entre viñetas no siempre le resultaba evidente al modelo solo con las imágenes.
Dos consejos que mejoraron esto. Primero, describe en tu prompt la lógica narrativa entre viñetas. El modelo necesita entender el progreso de la historia, no solo la secuencia visual. Segundo, si tu storyboard tiene texto o subtítulos, añade «text overlay no captions on screen» al prompt para evitar que el texto se cuele en el vídeo generado.
Mia también señala que puedes usar páginas reales de cómic para esto, pero ten cuidado con cualquier cosa que implique propiedad intelectual existente.
Referencias de estilo y replicación de plantillas → 14:45 en el vídeo de Mia
Mia's template replication tip is a practical one for anyone producing content at volume. If you have a video with a visual style you like, you can reference it and tell the model to replicate just the style, not the content. She tested this by pointing to a video and saying she only wanted the fisheye lens effect and the flickering double-exposure look, then combined it with character images and outfit references to create a fashion sequence. The model picked up the abstract visual qualities without copying the specific content of the reference video.
Esto es útil para mantener una identidad visual coherente en una serie de vídeos. Crea un vídeo que te guste y luego usa su estilo como referencia para todas las generaciones siguientes.
Tras la generación: amplía y edita → 16:06 en el vídeo de Mia
Un vídeo no está terminado una vez generado. Seedance 2.0 te permite ampliarlo, editarlo y reescribirlo después.
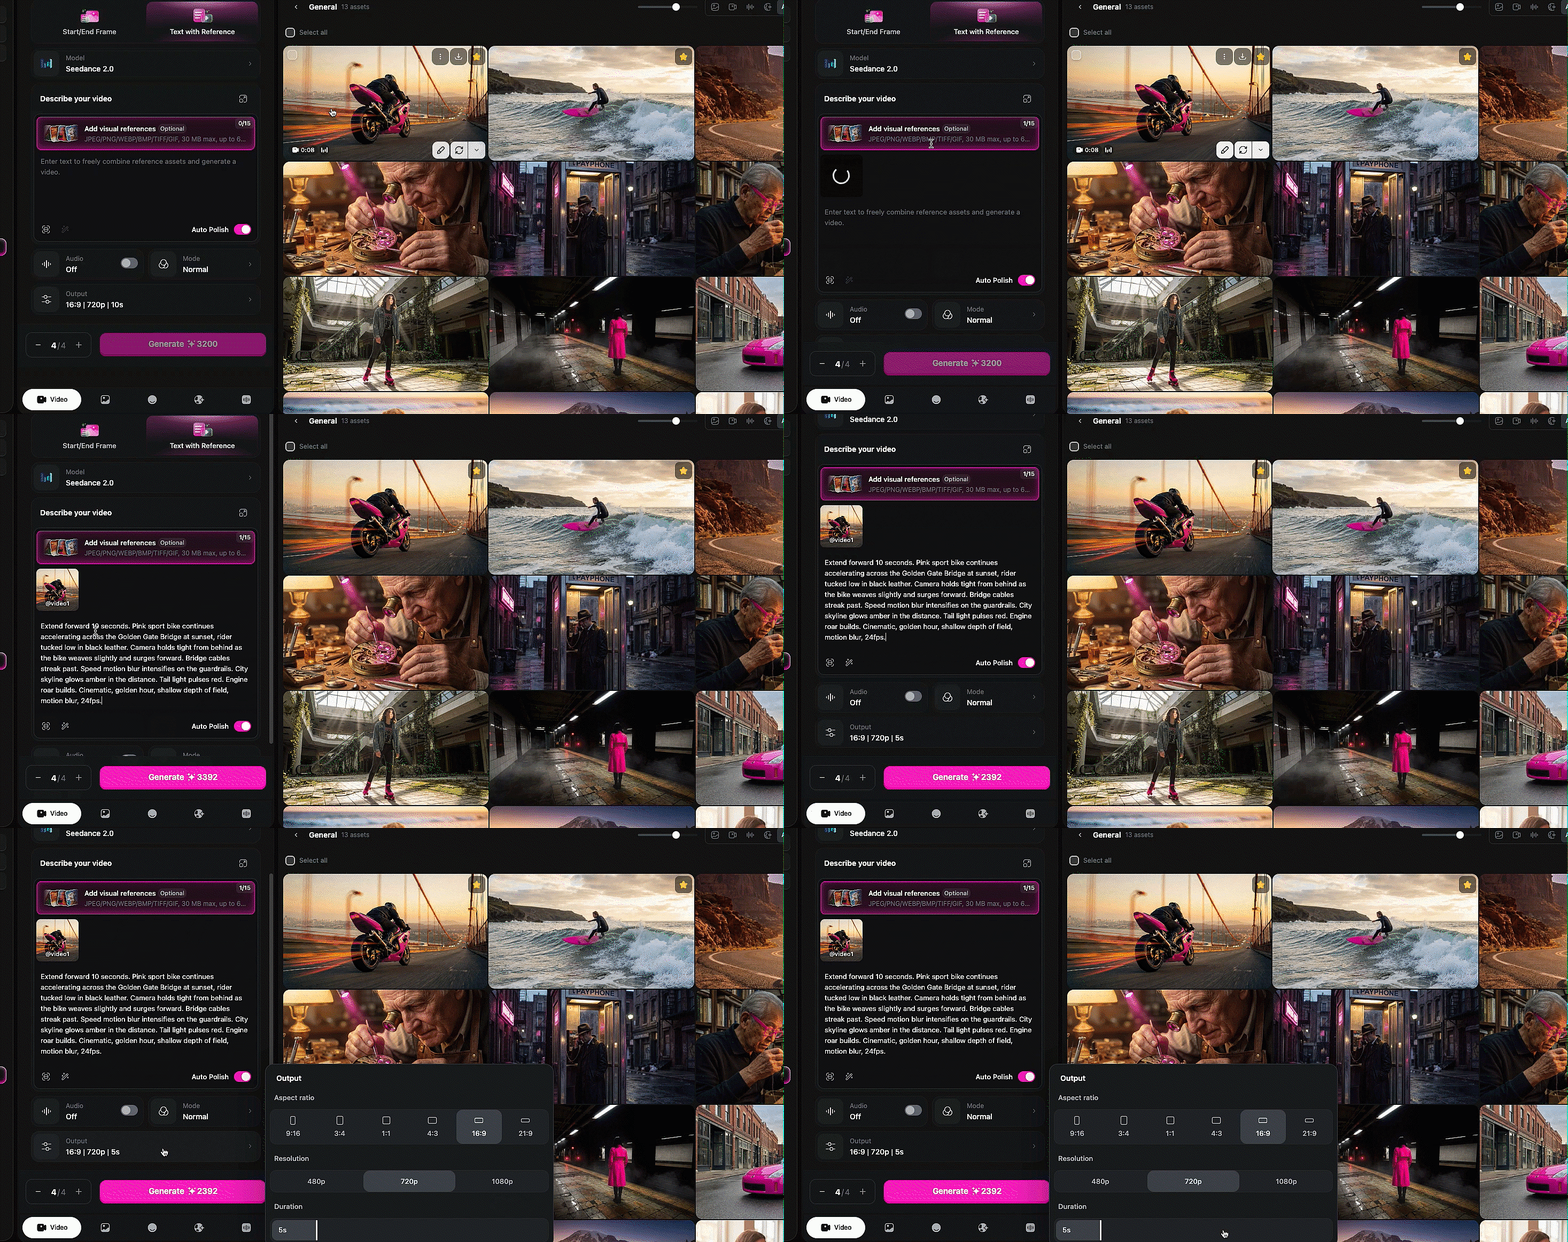
Ampliar. Sube un vídeo que quieras continuar, elige extender hacia delante (o hacia atrás), indica cuántos segundos, ajusta la duración para que coincida y describe qué quieres que pase en la parte nueva. Mia extendió un vídeo 10 segundos hacia delante, luego lo extendió 10 segundos hacia atrás y los combinó en una escena fluida más larga que el límite de generación de 15 segundos. Eso es un desbloqueo real. El límite de 15 segundos solía ser un techo infranqueable. Ahora puedes seguir construyendo escenas fluidas más largas sin cortes.
Editar. Si quieres cambiar algo que ya ocurrió en un vídeo generado, puedes hablar con el modelo sobre el vídeo existente y decirle qué modificar. Funciona de forma parecida a la edición de vídeo a vídeo de Wan 2.7, pero con la mayor comprensión de Seedance 2.0 sobre lo que hay en la escena.
En resumen
Seedance 2.0 is the most capable video model available on OpenArt right now, and the reference system is the reason to pay attention. The ability to tag images, video, and audio into a single prompt and have the model hold consistency across all of them is not something any other model is doing at this level. The lip sync is strong. The voice cloning works. The motion transfer is clean. The coherent VFX generation, where lighting and effects actually interact with the scene physically, is new territory entirely.
Tres creadores, tres vídeos, una misma conclusión: este modelo escucha. Sigue prompts complejos y con múltiples elementos mejor que cualquier otro. Lo mejor que puedes hacer es lanzarte y empezar a pedirle lo que quieres, porque tiene una imaginación increíble. Palabras de Bob, y tiene toda la razón.