
 ChatGPT
 Perplexity
 Claude
 Gemini
In February 2026, ByteDance dropped Seedance 2.0. Within 24 hours it was everywhere, because a filmmaker generated a Hollywood-quality fight scene with a two-line prompt. The Deadpool screenwriter saw it and publicly posted that it was likely over for screenwriters. Elon Musk replied. The Motion Picture Association issued a formal statement the same day. ByteDance pulled the ability to generate real celebrity likenesses, tightened the guardrails, and the internet held its breath wondering if the model had been gutted in the process.
そうではありませんでした。根底にある能力、動作、物理、モーション、感情の演技、そのすべてがそのまま保たれていました。そして正直なところ、そうした議論は必要です。生成AIはどんな法的枠組みが追いつくよりも速く進んでいて、業界がそれにどう向き合うかは重要です。ただ、それはまた別の動画の話。私たちが言えるのは、Seedance 2.0は現在市場で最も高性能な動画モデルであり、OpenArtで利用できるということです。
コンテンツメディア&エデュケーション責任者のErmin Monzonが、このモデルが技術的になぜ重要なのかを解説しました。社内クリエイターのBobは、思いつく限りのあらゆる参照タイプを徹底検証。そしてコラボレーターのMia Meowは、数週間のテストから10のヒントを盛り込んだワークフローガイドを作成しました。このハンドブックは、この3人の最も優れた素材を集め、全体像を一つにまとめてお届けします。
Seedance 2.0 でできること → Erminの概要
ワークフローのコツに入る前に、なぜこのモデルがこれほど話題になっているのかを理解しておく価値があります。Erminは、Seedance 2.0が市場の他のすべてを引き離しているポイントを示す一連のデモを紹介しました。
The fight scene that broke the internet is the obvious headline, but the demo that surprised Ermin more was a dancer with neon light trails sweeping around them in orbital arcs. It looks like a Nike commercial or a music video with a serious production budget. The reason this is technically significant is that the light trails are not composited over the dancer. The model generated both simultaneously. The motion and the effect interact with each other: the trails bend around the dancer's body, and the lighting from the trails actually reflects on the floor beneath them. That is called coherent VFX generation. The model understands that light behaves physically. It does not just paint glowing lines on top of video. For anyone doing music video content, UGC ads, or anything with a visual effects component, this is where Seedance 2.0 stands apart.
もう一つ注目のデモ:山から飛び出すスキーヤーの背景いっぱいに広がるアルプスの山並み。舞い上がる雪しぶきの物理、体の回転、着地。すべて生成されたもので、すべてが物理的に自然です。このモデルは、現在公開されている他のどのツールも及ばないレベルでアクションとモーションを処理します。
テキストから動画:ワンテイクの prompt 構成 → Miaの動画の0:50
Miaのテキストから動画へのデモで聞こえる音声や環境音は、すべて動画と同時に生成されたものです。プロンプト1つ、ワンテイクで完成。他のモデルはこれほど多くのディテールを1回の生成で維持するのに苦労しますが、Seedance 2.0はあなたの指示を忠実に再現します。
Miaのワンテイクショット向けのプロンプト構成はシンプルです。まず「continuous single take」とカメラの動きを書き、次にカメラが移動しながら映すものを描写します。最後に制御とスタイルのキーワードを添えます。no cuts、seamless transition、cinematic、high definition。この定型だけで十分に強力な結果が得られます。
より複雑なシーン、例えば 2:13のバトルシーン, Mia recommends starting with a clear beginning and end state. Describe the fight scene, describe how it ends (everyone on the ground, for example), and let the model fill the middle. She also found that describing specific camera angles creates a more cinematic feel, and adding a film genre reference to the end of the prompt helps set the visual tone. One thing she discovered through iteration: if you describe your characters physically in the prompt rather than leaving it vague, the model does a better job designing the scene and keeping characters visually distinct.
promptに関するMiaの重要な洞察:このモデルは映画用語をよく学習しています。「トラッキングショット」「クレーンショット」「ホイップパン」といった用語や、「荒々しい戦争映画」「ネオノワールのスリラー」といったジャンルの手がかりが大きな効果を発揮します。
Miaのフルチュートリアルでは、本ハンドブックを通じて凝縮してきたものを含む、彼女の10のワークフローのコツをすべて解説しています。一緒に見るのも、後で見返すのもおすすめです。
リファレンスシステム:画像・動画・音声を prompt にタグ付けする → Miaの動画の4:27 · → Bobによるリファレンス徹底解説
これはOpenArt上のSeedance 2.0で他のすべてを支える中核的な仕組みです。これを理解すれば、この後のすべてのセクションがぐっと分かりやすくなります。
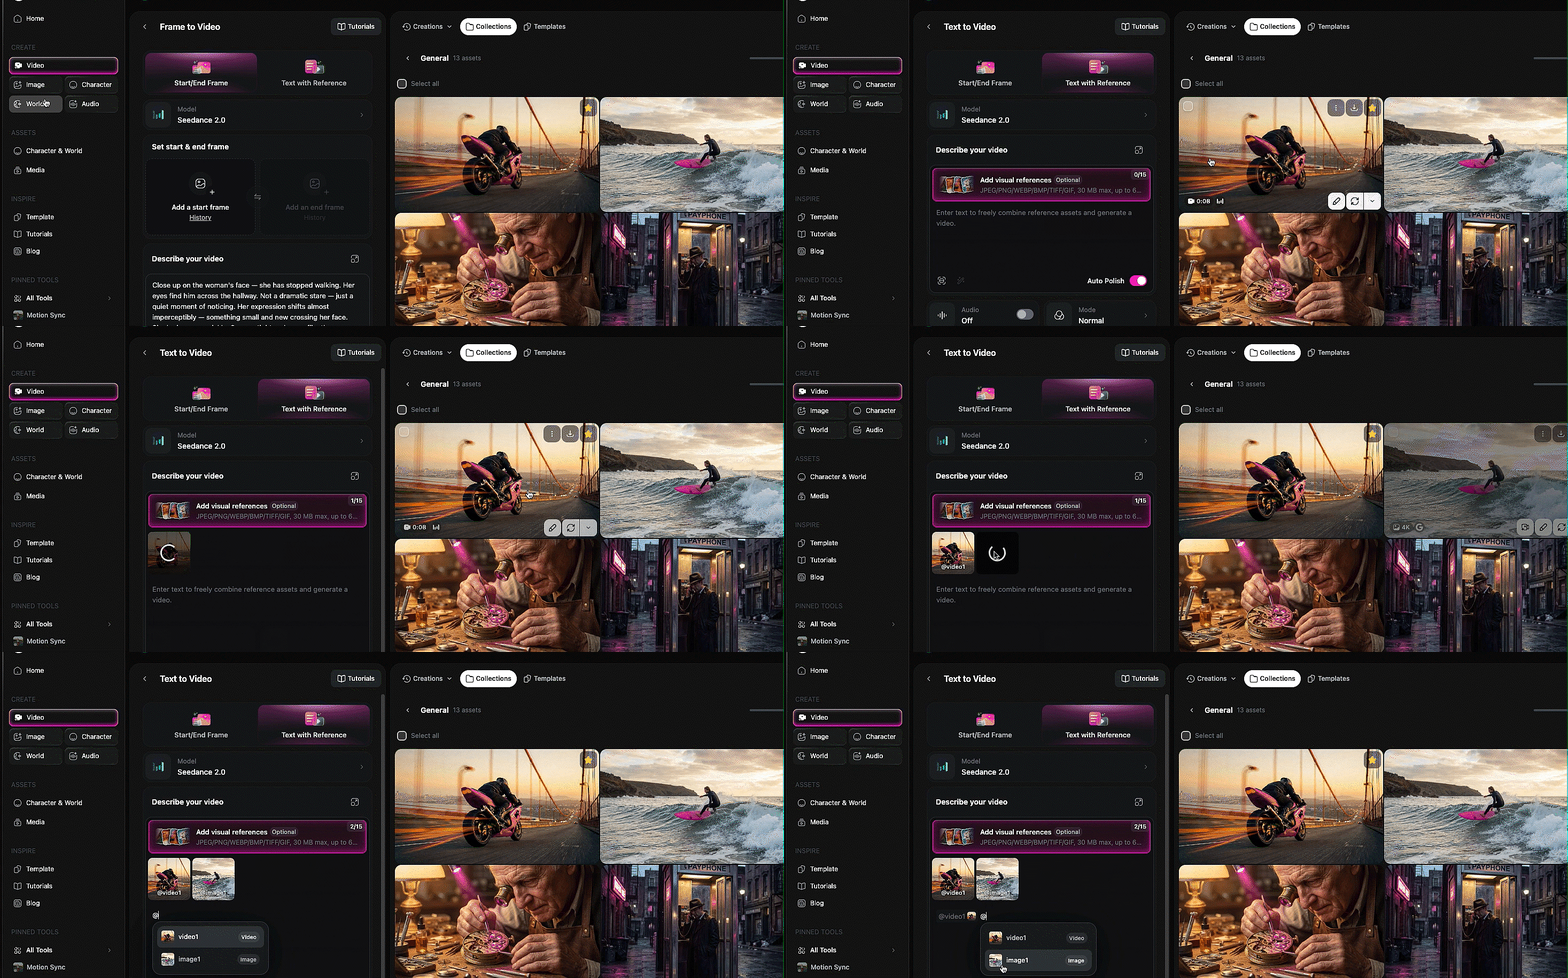
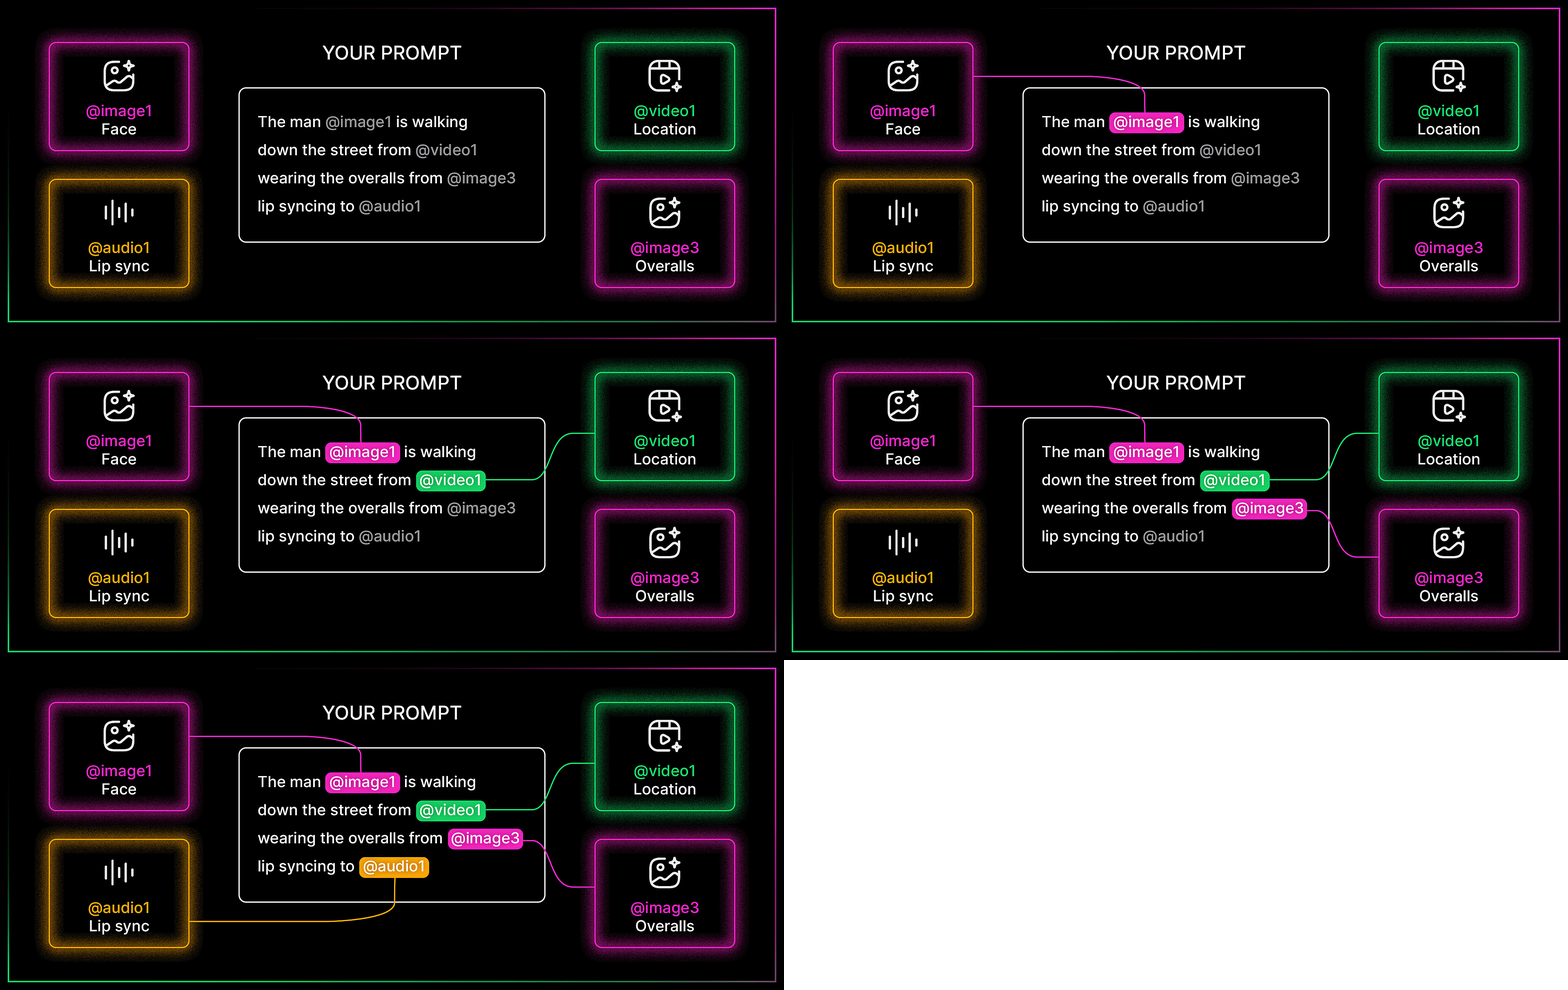
考え方はシンプルです。画像、動画、音声ファイルを参照としてアップロードし、@記号を使ってテキストプロンプト内で直接タグ付けできます。@を入力すると、参照したいアップロード済みファイルを選べます。そこから、それぞれをどう扱うかをモデルに正確に伝えます。画像1の顔を使う。動画1のカメラの動きを使う。音声1にリップシンクする。モデルはプロンプトを読み、タグ付けされたファイルを見て、すべてを1つの生成にまとめます。
Miaの 4:27のマルチモーダル解説 は、この仕組みを最もわかりやすく説明してくれる例です。彼女はダンス動画、キャラクター画像2枚、楽曲をアップロードし、動画をカメラモーションの参照、画像1枚目を左のダンサー、2枚目を右のダンサー、音声を背景音楽として使うようモデルに指示しました。すべて@でタグ付けし、すべて1つのプロンプトにまとめて。
Bob pushed this further. In one of his demos, he referenced four different files in a single prompt: the face from image one, the overalls from image three, the shirt from image four, and a location from a reference video. The prompt was: the man in image one is walking down the street from the video wearing the overalls from image three and carrying the shirt from image four, talking to the camera. The model held consistency across every element. That is a remarkable amount of compositing happening from a single text prompt.
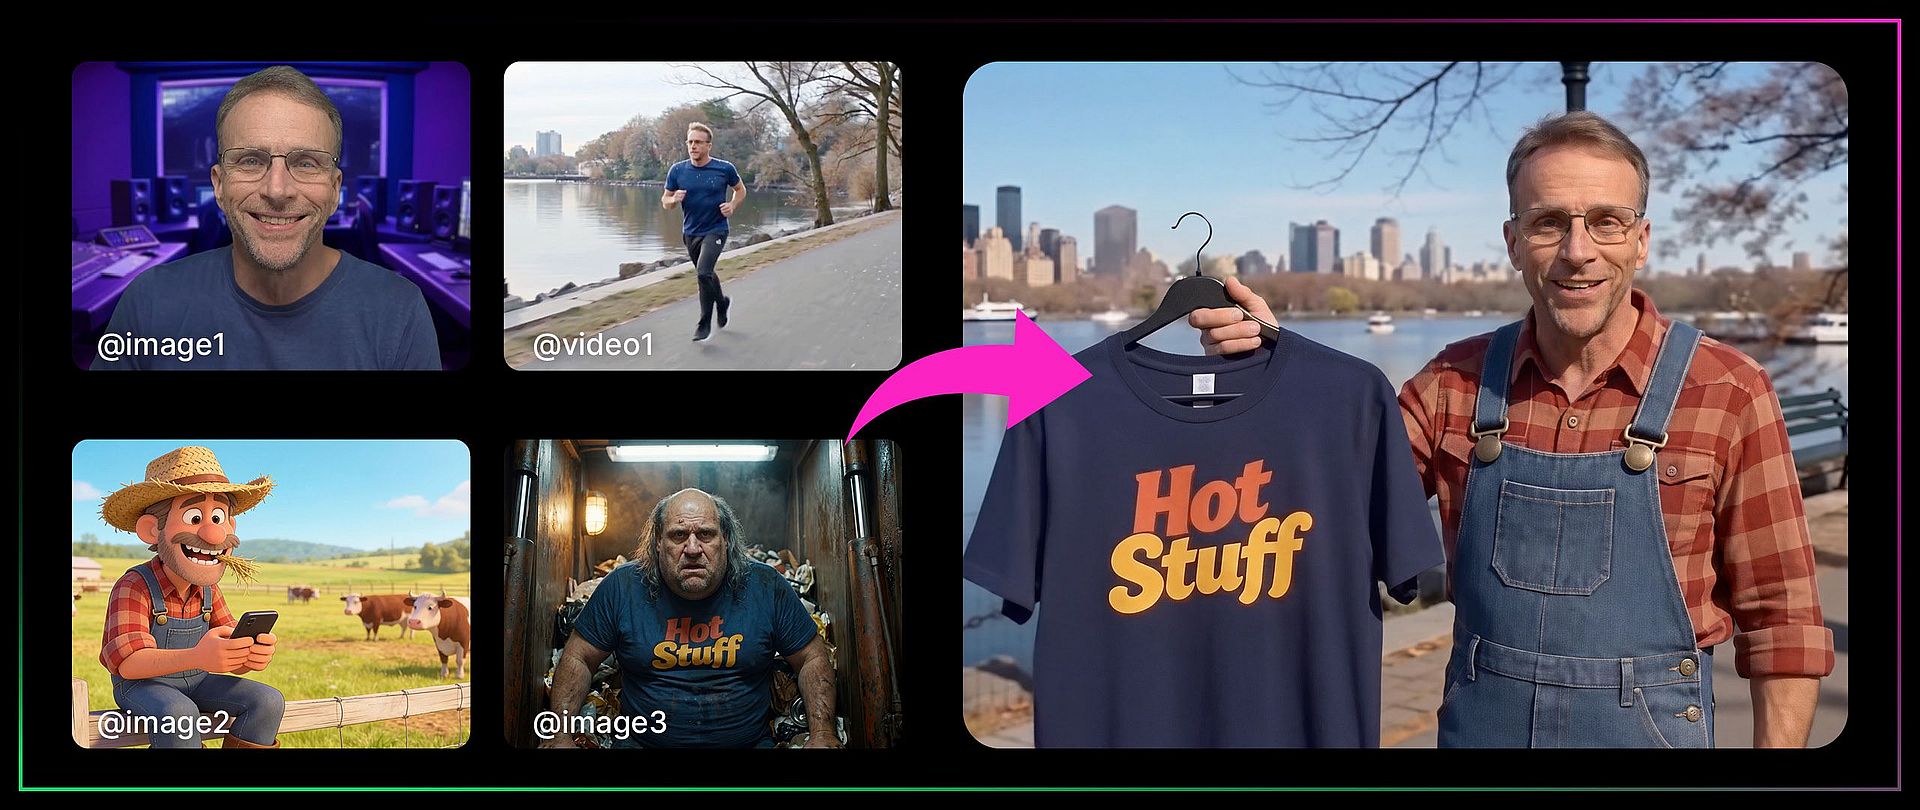
参照がどのように機能するかについて、2人のクリエイターが学んだいくつかのポイント:
参照動画に音声があり、さらに別の音声ファイルもタグ付けした場合、 モデルはアップロードしたトラックよりも動画の既存オーディオを優先しがちです。Miaの回避策:自分の音楽やナレーションを優先したい場合は、オーディオなしで動画をアップロードしましょう。
参照は具体的な要素に限られません。 動画を指定して「こんな感じにしたい」と伝えるだけで、それ以外の要素をコピーせずに済みます。Bob はこの方法で、ある動画のビジュアルスタイル(魚眼レンズ、ちらつく光)をまったく新しいシーンへ移し替えました。
すべての参照タイプを一度に使う必要はありません。 テキストプロンプトにキャラクター画像を1枚使うだけでも、システムとして完全に有効です。要素を重ねるほど威力を発揮しますが、どんな複雑さのレベルでも問題なく機能します。
リップシンク、ボイス、パフォーマンス → Miaの動画の7:57 · → Bobによるオーディオ徹底解説
Bobのフルバージョン動画では、画像・音声・動画にわたるリファレンスを深く掘り下げています。特にリップシンクとボイスクローンのパートは見どころです。
ここは最も多くのクリエイターから最も多くのヒントが寄せられたセクションで、それには理由があります。Seedance 2.0 の音声機能こそ、現在市場にあるほかのすべてとの決定的な違いなのです。
Bobのトランスクリプト活用術
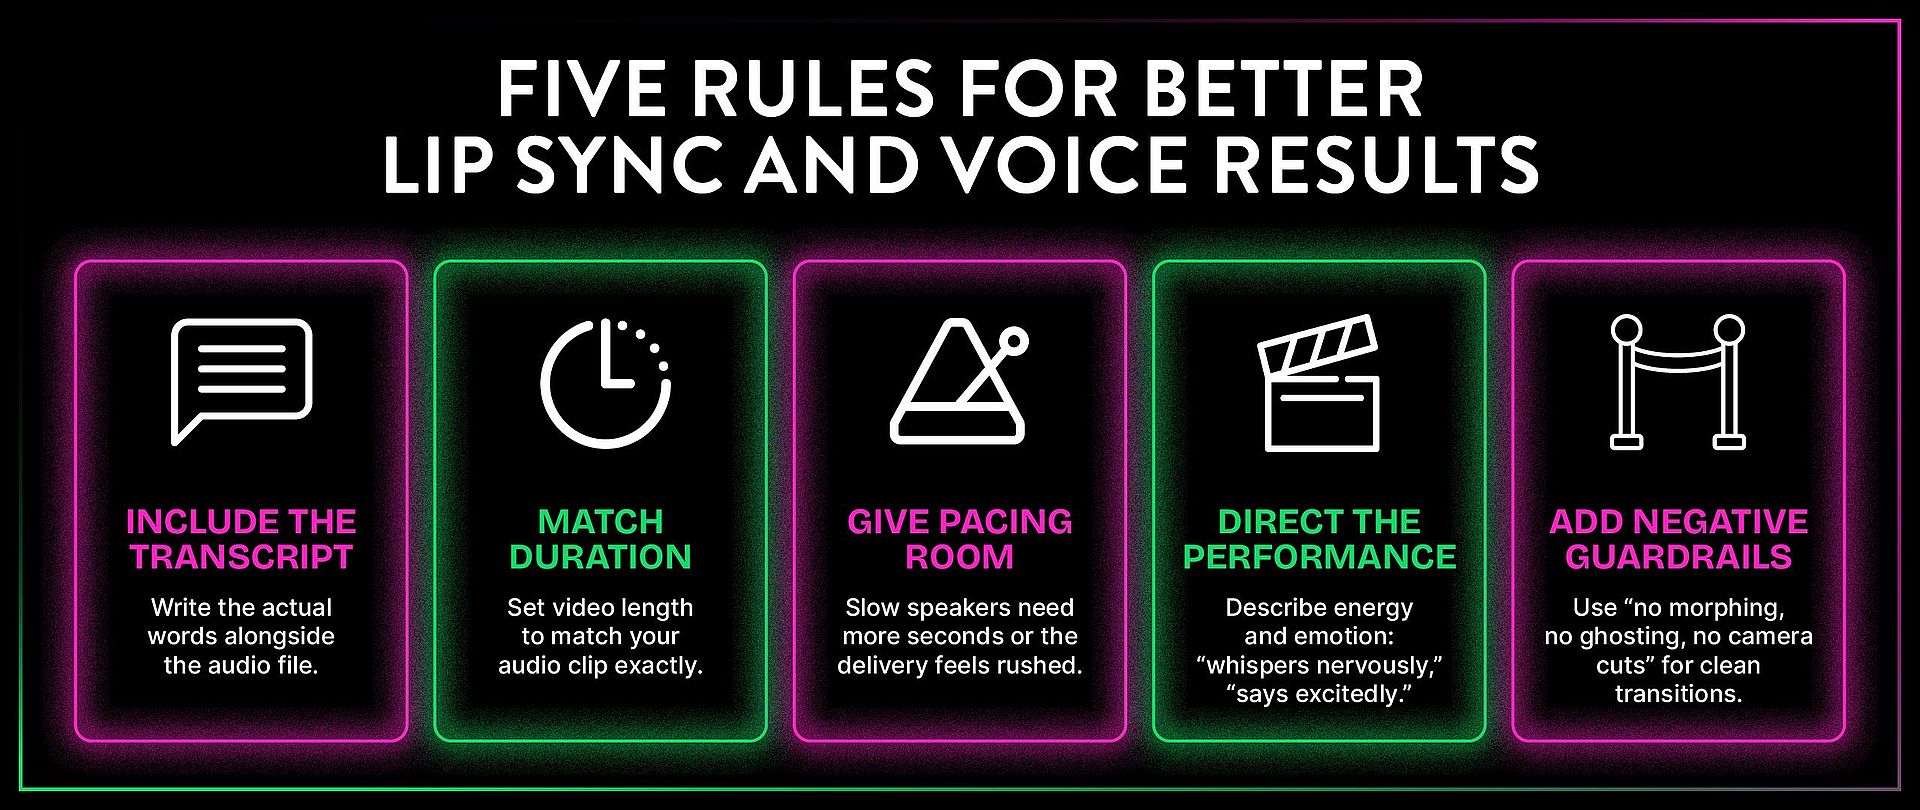
これは3本の動画すべてを通じて最も役立つコツです。音声リファレンスを使ってリップシンクを行うとき、音声ファイルと一緒に、実際に話される言葉の書き起こしをプロンプトに含めましょう。その理由は次の通りです。
Bob tested this with a clip of himself talking to camera. In his first attempt, he tagged the audio file and described the scene but did not include the exact words being spoken. The model listened to the audio and tried to replicate it, but got details wrong ("CGI 2.0" instead of "Seedance 2.0"). When he modified the prompt to explicitly spell out the words being said, the audio file combined with the written transcript produced dramatically better results. The lip sync was tighter, the words were accurate, and the overall performance was more convincing.
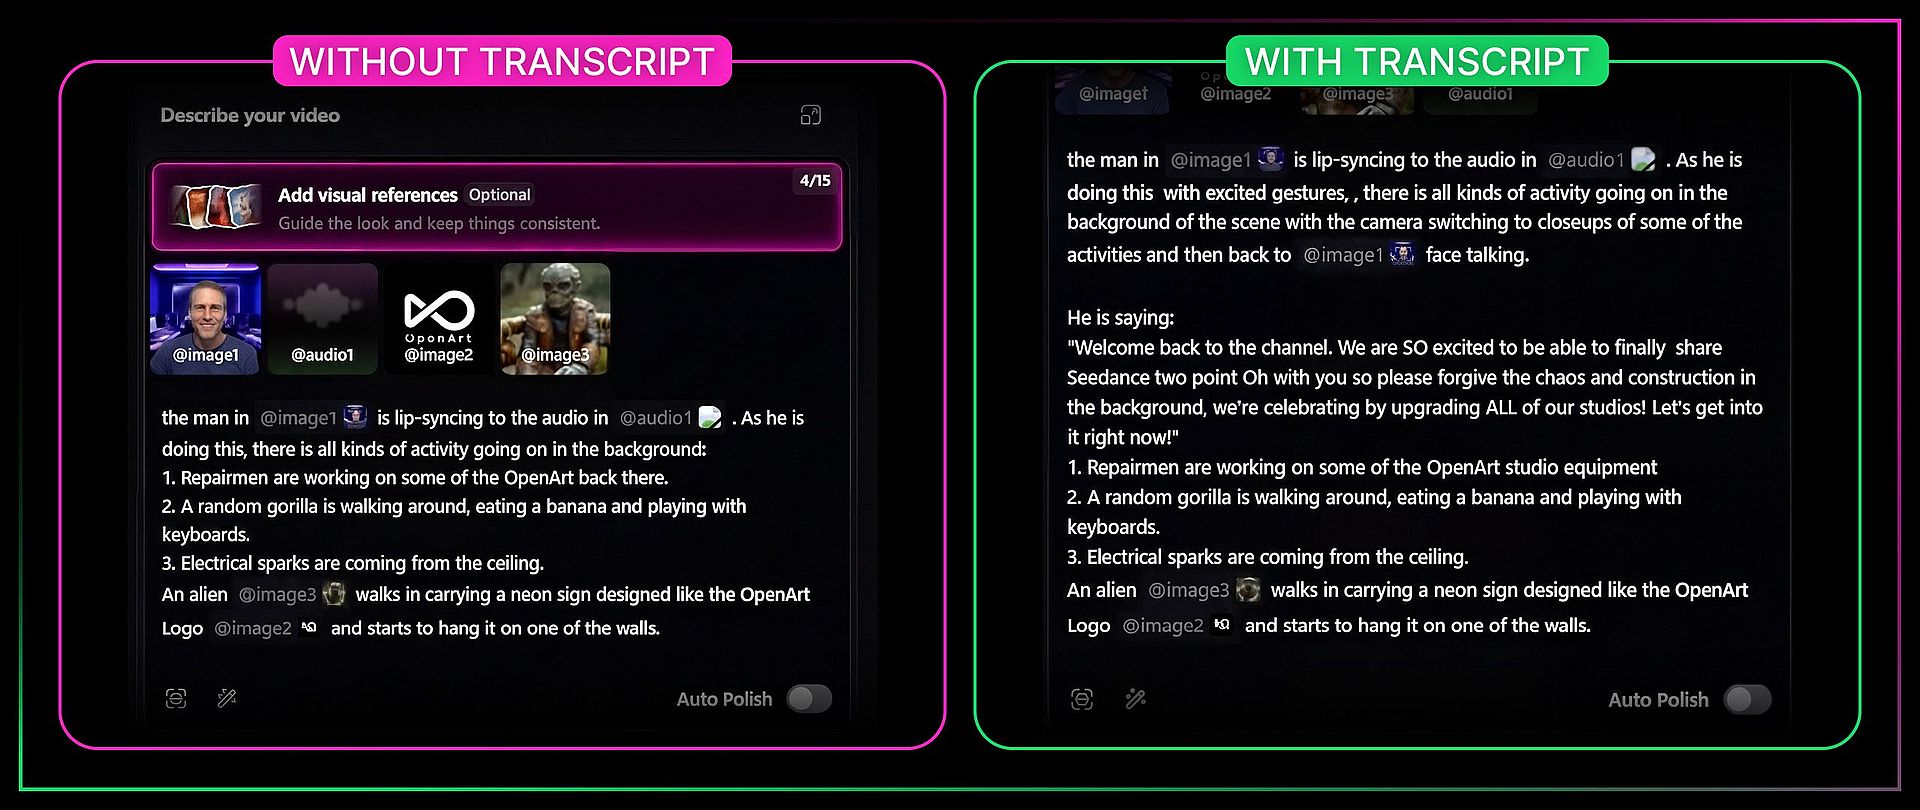
ポイント:リップシンクを行うときは、音声ファイルと一緒に実際の文字起こしも渡しましょう。ほぼ確実に、より良い結果が得られます。
オーディオの長さを動画の長さに合わせる
Miaはこれを痛い目に遭って学びました。オーディオの参照が11秒なのに動画を15秒に設定すると、モデルはオーディオを引き伸ばしたり圧縮したりして合わせざるを得なくなり、ほぼ確実にタイミングが崩れます。長さの設定は、必ず実際のオーディオファイルの長さに合わせましょう。
ボイスクローン
Bobは、Erminの声(OpenArtオフィスでの通称Uncle Monz)を15秒のクリップで再現し、ボイスクローンをデモンストレーションしました。手順はこうです:複製したい声質を捉えられるように、約15秒間の声を録音します。その音声をリップシンクのソースではなく、ボイスリファレンスとしてタグ付けします。そしてプロンプトに実際のセリフを書くと、モデルがその声で新しい発話を生成します。
最初の試みはErminの自然なテンポには速すぎました。Bobがモデルに9秒ではなく丸14秒を与えたところ、結果はErminの実際の話し方に格段に近づきました。教訓:ペーシングは声のサンプルと同じくらい重要だということ。その声に合った適切な速度で言葉を届けられるだけの時間をモデルに与えましょう。
同じ音声リファレンスを複数の動画で再利用すれば、キャラクターの声を一貫させられます。
Miaのパフォーマンスディレクションのコツ → Miaの動画の12:20
Miaは、キャラクターの感情表現やエネルギーをプロンプト自体でディレクションできることを発見しました。書く言葉は、セリフの内容だけでなく、キャラクターがどう話すかにも影響します。「彼は興奮気味に言う」と書けば、キャラクターのボディランゲージや声のエネルギーが変わります。「彼女は緊張しながらささやく」と書けば、演技全体が変わります。
これは同じシーンに複数のキャラクターがいる場合にも当てはまります。 Miaの動画の11:10では、1 つの prompt で 2 人のキャラクターに異なる声のキャラクターや感情表現を与える様子を実演しており、モデルは両者をきちんと区別し続けます。
Miaのネガティブガードレール活用術
シーン間をモーフィングなしでクリーンに切り替えたいとき(たとえば4枚の異なる画像にまたがってナレーションする場合)、Miaはプロンプトにネガティブなガードレールを追加することを学びました。「モーフィングなし、ゴーストなし、カメラカットなし」。これがないと、モデルが時々シーンを混ぜ合わせ、視覚的なグリッチのように見えることがあります。ガードレールを入れれば、シーンからシーンへとくっきり切り替わります。
高度なリファレンス:モーション、絵コンテ、スタイル → Miaの動画の13:22 · → Bobの動画リファレンス
顔や声のリファレンスシステムの仕組みが分かったところで、他に何を参照できるかを見ていきましょう。
モーションとカメラの転送
カメラの動きが気に入ったショットがあれば、そのカメラモーションをまったく新しいシーンに転写できます。Bobは、カメラがドリーで回り込む中で犬が飛び跳ねる動画でこれを実演しました。彼はその動画をリファレンスとして取り込み、「この動画をカメラとキャラクターの動きのリファレンスとして使い、トランポリンで飛び跳ねるかかしを演出して」と伝えました。その結果、カメラのドリーと飛び跳ねる動作の両方が、新しいキャラクターとシーンに転写されました。
彼は実際の映像を使ったモーション転送も披露しました。使ったのは 19:15にEmilyが走るクリップでは、「動画1の女性を画像1の男性に置き換えて、雪を降らせて」と指示しました。モデルはキャラクターを入れ替え、冬の天候を加えつつ、走る動きをそのまま維持しました。背景のディテールは一部変わりました(全体の雰囲気が灰色の冬景色に変化)が、核となる動きは保たれました。
Character Swap Split Screen LRB.mp4
絵コンテから動画へ → Miaの動画の13:22
コマ割り形式のグリッドやストーリーボードをアップロードすると、モデルがコマごとに順を追ってアニメーション化を試みます。Miaが手描きのグリッドでテストしたところ、モデルはコマを順番どおりにたどりましたが、コマ間の方向的なロジックはビジュアルだけからは必ずしも明確に読み取れませんでした。
うまくいくためのコツが2つあります。まず、promptでパネル間のストーリーの流れを説明すること。モデルは単なるビジュアルの並びだけでなく、物語の進行を理解する必要があります。次に、ストーリーボードにテキストやキャプションがある場合は、promptに「text overlay no captions on screen」を追加して、文字が生成された動画に紛れ込むのを防ぎましょう。
Miaによれば、実際のコミック本のページを使うこともできますが、既存のIPが絡むものには注意が必要です。
スタイル参照とテンプレート複製 → Miaの動画の14:45
Mia's template replication tip is a practical one for anyone producing content at volume. If you have a video with a visual style you like, you can reference it and tell the model to replicate just the style, not the content. She tested this by pointing to a video and saying she only wanted the fisheye lens effect and the flickering double-exposure look, then combined it with character images and outfit references to create a fashion sequence. The model picked up the abstract visual qualities without copying the specific content of the reference video.
これは一連の動画で一貫したビジュアルアイデンティティを保つのに便利です。気に入った動画を1本作れば、以降の生成すべてでそのスタイルを参照できます。
生成後:拡張と編集 → Miaの動画の16:06
動画は生成したら終わりではありません。Seedance 2.0なら、後から延長、編集、書き換えができます。
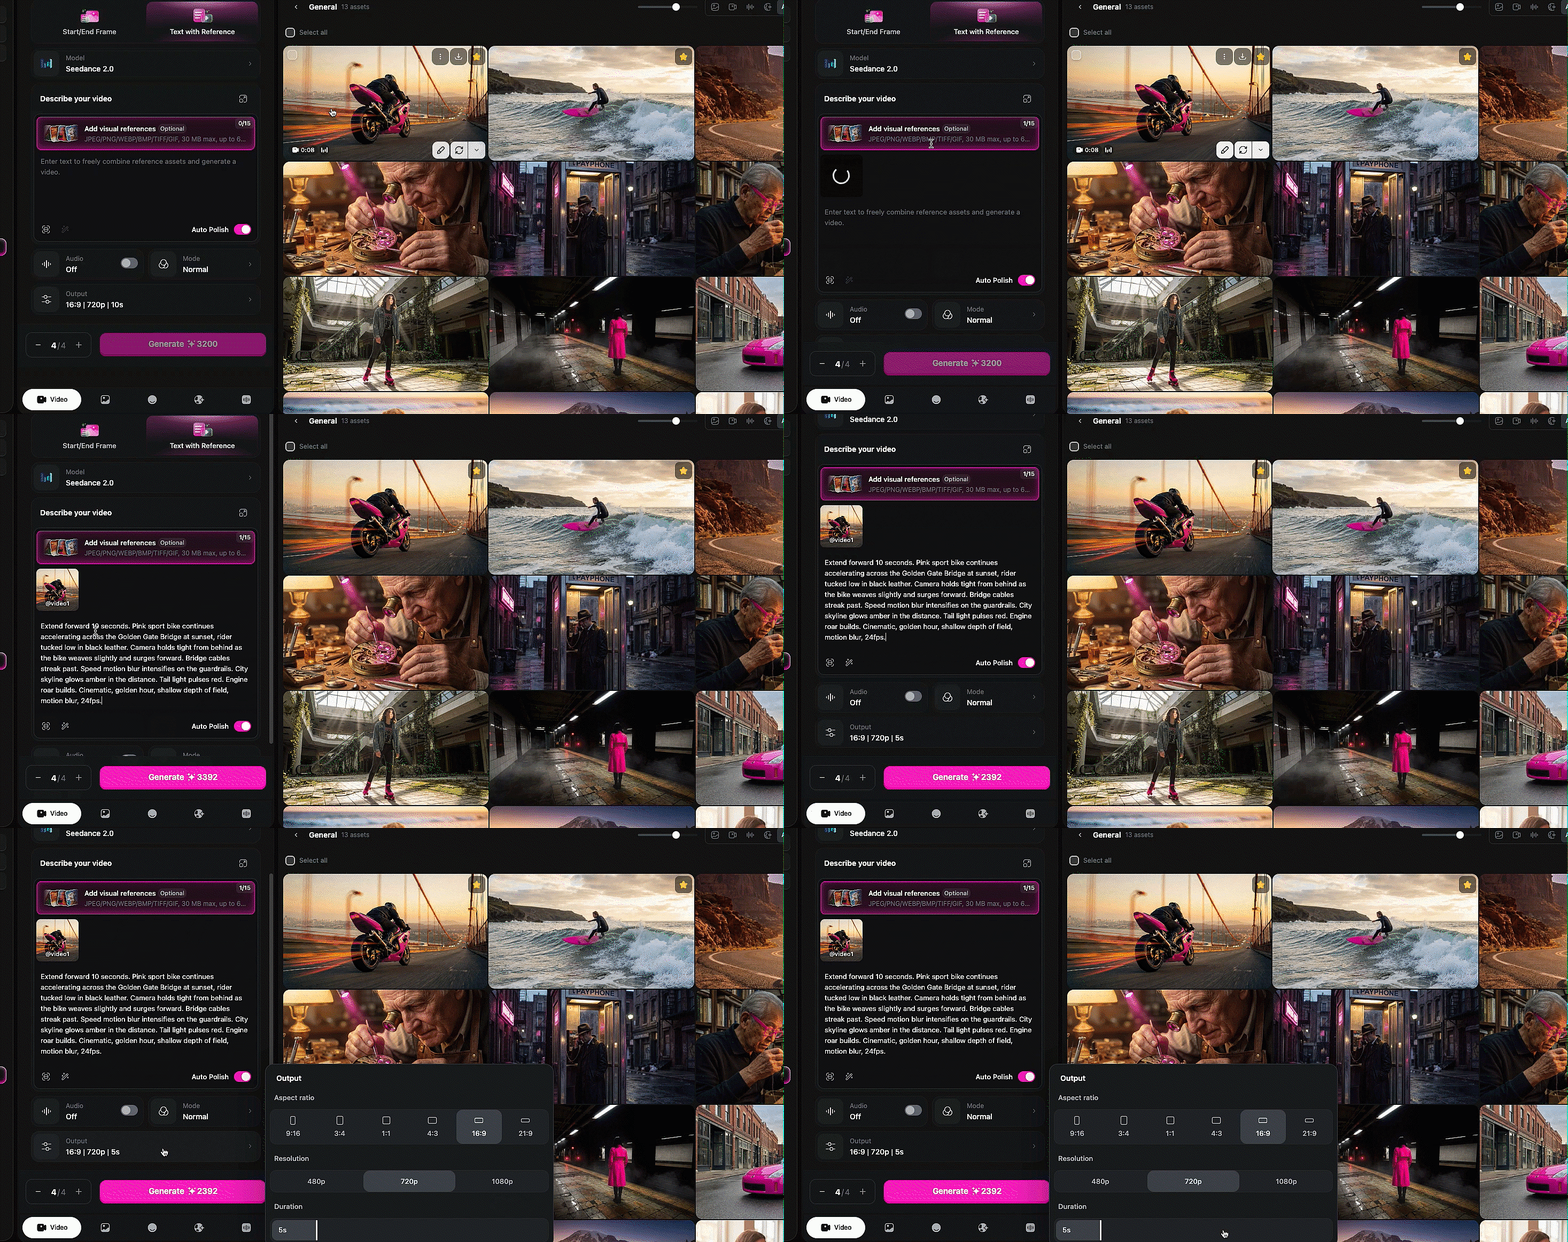
拡張。 続きを作りたい動画をアップロードし、前方(または後方)への延長を選び、何秒延長するかを指定し、デュレーション設定を合わせて調整し、新しい部分で起こしたい内容を記述します。Miaは動画を前方に10秒延長し、次に後方に10秒延長して、それらを組み合わせて15秒の生成上限を超えるシームレスなシーンを作りました。これは本当のブレイクスルーです。かつて15秒の制限は絶対的な上限でした。今ではカットなしで、より長くシームレスなシーンをどんどん構築できます。
編集。 生成済みの動画ですでに起こったことを変えたいときは、既存の動画についてモデルと対話し、何を変えたいかを伝えられます。これはWan 2.7の動画から動画への編集と同じように機能しますが、Seedance 2.0はシーンの内容をより深く理解しています。
結論
Seedance 2.0 is the most capable video model available on OpenArt right now, and the reference system is the reason to pay attention. The ability to tag images, video, and audio into a single prompt and have the model hold consistency across all of them is not something any other model is doing at this level. The lip sync is strong. The voice cloning works. The motion transfer is clean. The coherent VFX generation, where lighting and effects actually interact with the scene physically, is new territory entirely.
3人のクリエイター、3本の動画、そして共通する1つの結論——このモデルはちゃんと聞いてくれます。複雑で複数の要素を含むプロンプトを、他のどれよりも忠実に再現します。一番いいのは、実際に使い込んで欲しいものを求めてみること。驚くほど豊かな想像力を持っているからです。Bobの言葉ですが、まさにその通りです。