

 ChatGPT
 Perplexity
 Claude
 Gemini
In February 2026, ByteDance dropped Seedance 2.0. Within 24 hours it was everywhere, because a filmmaker generated a Hollywood-quality fight scene with a two-line prompt. The Deadpool screenwriter saw it and publicly posted that it was likely over for screenwriters. Elon Musk replied. The Motion Picture Association issued a formal statement the same day. ByteDance pulled the ability to generate real celebrity likenesses, tightened the guardrails, and the internet held its breath wondering if the model had been gutted in the process.
Ce n'était pas le cas. La capacité sous-jacente, l'action, la physique, le mouvement, la performance émotionnelle, tout est resté intact. Et honnêtement, ces conversations doivent avoir lieu. L'IA générative avance plus vite que n'importe quel cadre juridique ne peut suivre, et la façon dont l'industrie gère ça compte. Mais c'est une autre vidéo. Ce qu'on peut te dire, c'est que Seedance 2.0 est le modèle vidéo le plus performant du marché en ce moment, et il est dispo sur OpenArt.
Ermin Monzon, notre responsable Content Media & Education, a expliqué en quoi le modèle compte techniquement. Notre créateur maison Bob a testé à fond chaque type de référence auquel il pouvait penser. Et notre collaboratrice Mia Meow a bâti un guide de workflow en 10 astuces à partir de semaines de tests. Ce Handbook rassemble le meilleur des trois pour t'offrir une vue complète.
Ce que Seedance 2.0 peut faire → Vue d'ensemble d'Ermin
Avant de passer aux astuces de workflow, il vaut la peine de comprendre pourquoi ce modèle suscite une telle réaction. Ermin a présenté une série de démos qui montrent où Seedance 2.0 se détache de tout le reste sur le marché.
The fight scene that broke the internet is the obvious headline, but the demo that surprised Ermin more was a dancer with neon light trails sweeping around them in orbital arcs. It looks like a Nike commercial or a music video with a serious production budget. The reason this is technically significant is that the light trails are not composited over the dancer. The model generated both simultaneously. The motion and the effect interact with each other: the trails bend around the dancer's body, and the lighting from the trails actually reflects on the floor beneath them. That is called coherent VFX generation. The model understands that light behaves physically. It does not just paint glowing lines on top of video. For anyone doing music video content, UGC ads, or anything with a visual effects component, this is where Seedance 2.0 stands apart.
Une autre démo à voir : un skieur s'élançant du haut d'une montagne avec une chaîne alpine en fond. La physique de la gerbe de neige, la rotation du corps, la réception. Tout est généré, tout est physiquement plausible. Le modèle gère l'action et le mouvement à un niveau qu'aucun autre outil accessible au public n'atteint aujourd'hui.
Texte vers vidéo : la structure de prompt en une seule prise → 0:50 dans la vidéo de Mia
Tout ce que tu entends dans les démos texte-vers-vidéo de Mia, l'audio, l'ambiance sonore, a été généré en même temps que la vidéo. Un seul prompt, une seule prise. Les autres modèles peinent à maintenir autant de détails dans une seule génération. Seedance 2.0, lui, suit vraiment ce que tu lui donnes.
La structure de prompt de Mia pour les plans en une seule prise est simple. Commence par « continuous single take » et tes actions de caméra. Décris ensuite ce que la caméra voit pendant qu'elle bouge. Termine par des mots-clés de contrôle et de style : no cuts, seamless transition, cinematic, high definition. Cette formule à elle seule te donnera d'excellents résultats.
Pour des scènes plus complexes, comme un séquence de combat à 2:13, Mia recommends starting with a clear beginning and end state. Describe the fight scene, describe how it ends (everyone on the ground, for example), and let the model fill the middle. She also found that describing specific camera angles creates a more cinematic feel, and adding a film genre reference to the end of the prompt helps set the visual tone. One thing she discovered through iteration: if you describe your characters physically in the prompt rather than leaving it vague, the model does a better job designing the scene and keeping characters visually distinct.
Le conseil clé de Mia sur le prompting : le modèle est bien entraîné au langage du cinéma. Des termes comme « tracking shot », « crane shot », « whip pan » et des indices de genre comme « film de guerre brut » ou « thriller néo-noir » font toute la différence.
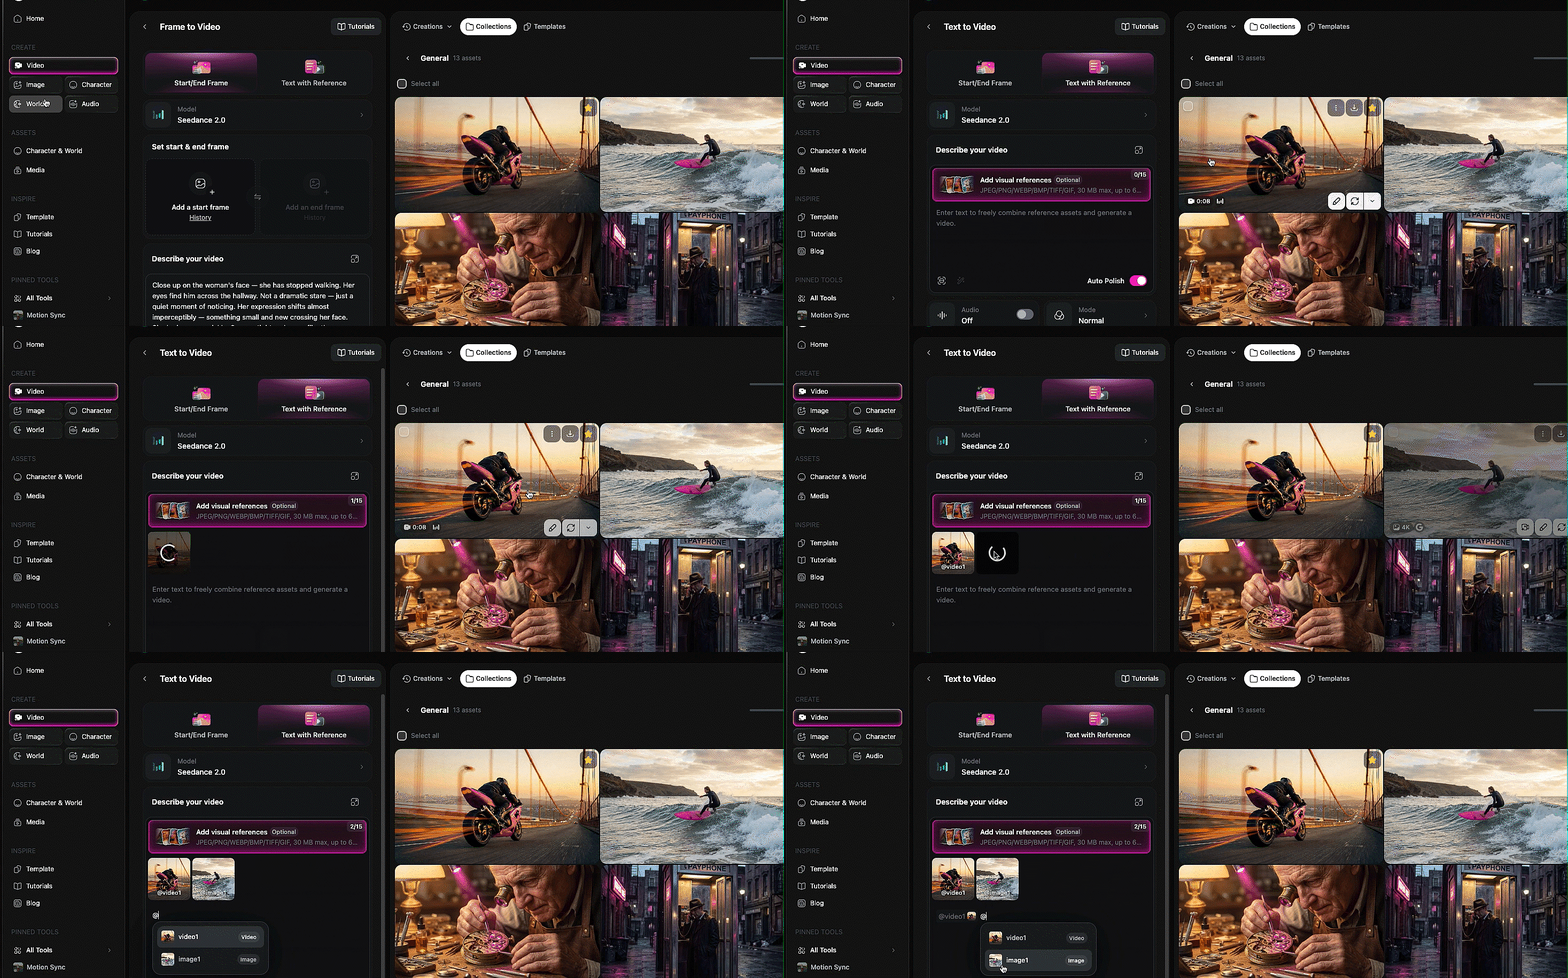
Le tutoriel complet de Mia couvre ses 10 astuces de workflow, y compris celles qu'on a résumées tout au long de ce guide. Regarde-le en parallèle ou reviens-y plus tard.
Le système de références : taguer images, vidéos et audio dans ton prompt → 4:27 dans la vidéo de Mia · → Le guide approfondi des références de Bob
C'est le mécanisme central qui alimente tout le reste dans Seedance 2.0 sur OpenArt, et une fois que tu l'auras compris, chaque section qui suit prendra tout son sens.
L'idée est simple : tu importes des images, des vidéos et des fichiers audio comme références, puis tu les tagues directement dans ton prompt texte grâce au symbole @. Tape @ et choisis le fichier importé que tu veux référencer. Ensuite, tu dis exactement au modèle quoi faire de chacun. Utilise le visage de l'image un. Reprends le mouvement de caméra de la vidéo un. Synchronise les lèvres sur l'audio un. Le modèle lit ton prompt, examine les fichiers tagués et combine le tout en une seule génération.
Mia's tutoriel multimodal à 4:27 offre l'explication la plus claire de son fonctionnement. Elle a importé une vidéo de danse, deux images de personnages et une chanson, puis a demandé au modèle d'utiliser la vidéo comme référence de mouvement de caméra, l'image une comme danseur de gauche, l'image deux comme danseur de droite et l'audio comme musique de fond. Le tout tagué avec @, le tout dans un seul prompt.
Bob pushed this further. In one of his demos, he referenced four different files in a single prompt: the face from image one, the overalls from image three, the shirt from image four, and a location from a reference video. The prompt was: the man in image one is walking down the street from the video wearing the overalls from image three and carrying the shirt from image four, talking to the camera. The model held consistency across every element. That is a remarkable amount of compositing happening from a single text prompt.
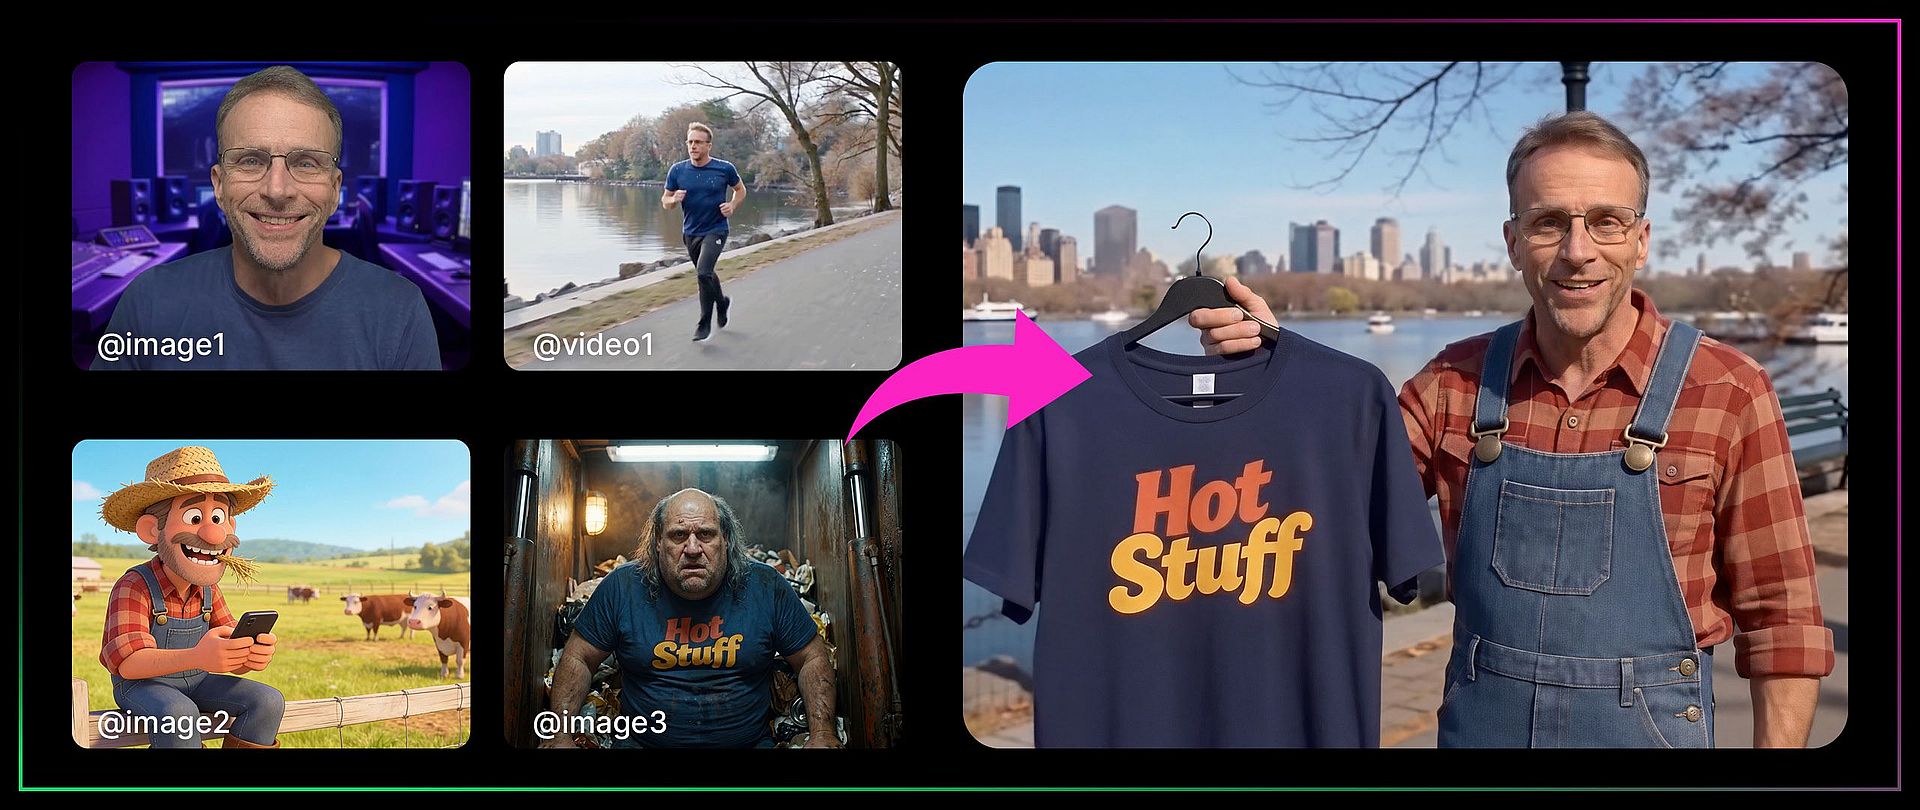
Quelques enseignements que les deux créateurs ont tirés sur le comportement des références :
Si ta vidéo de référence contient de l'audio et que tu tagues aussi un fichier audio séparé, le modèle a tendance à privilégier l'audio existant de la vidéo plutôt que ta piste importée. L'astuce de Mia : importe la vidéo sans audio si tu veux que ta propre musique ou voix off prenne le dessus.
Les références ne se limitent pas à des éléments concrets. Tu peux aussi pointer une vidéo et dire « Je veux juste que ça ressemble à ça » sans rien copier d'autre. Bob a utilisé cette astuce pour transférer un style visuel (objectif fisheye, lumière vacillante) d'une vidéo vers une scène entièrement nouvelle.
Tu n'es pas obligé d'utiliser tous les types de références en même temps. Une seule image de personnage dans un prompt textuel est un usage parfaitement valable du système. La puissance augmente avec le nombre d'éléments que tu superposes, mais ça fonctionne bien à chaque niveau de complexité.
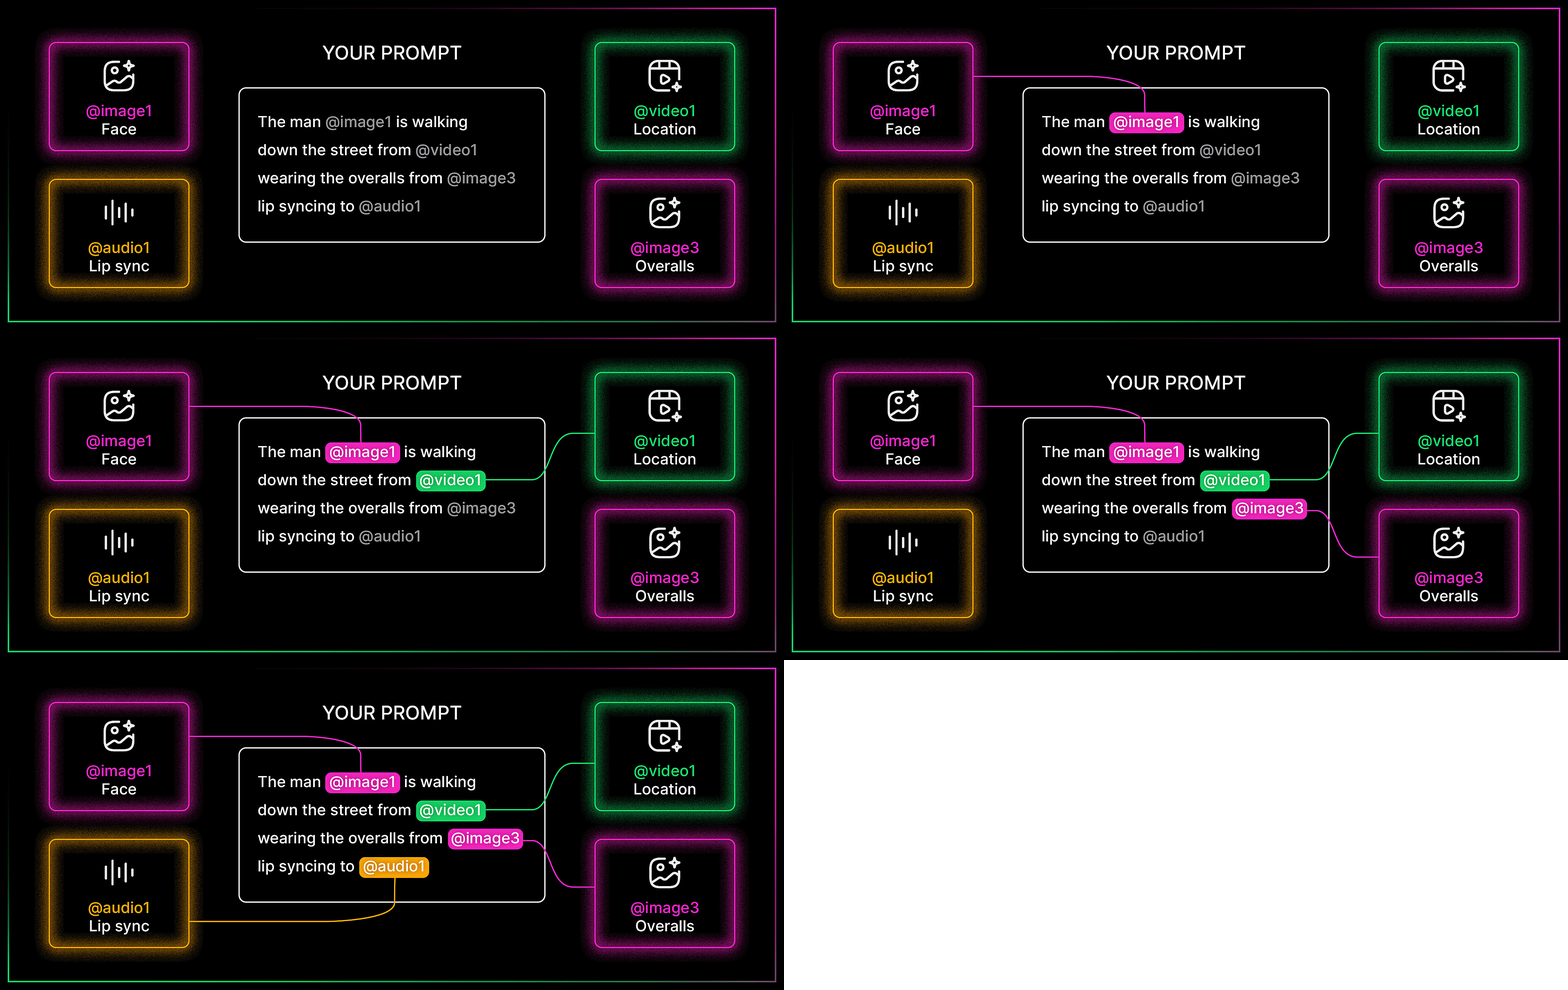
Lip-sync, voix et performance → 7:57 dans la vidéo de Mia · → L'analyse audio approfondie de Bob
La vidéo complète de Bob couvre en profondeur les références dans les images, l'audio et la vidéo. Les sections sur le lip sync et le clonage vocal sont là où elle brille vraiment.
C'est la section avec le plus de conseils du plus grand nombre de créateurs, et pour cause. Les capacités audio de Seedance 2.0 sont ce qui le distingue de tout le reste sur le marché en ce moment.
L'astuce de transcription de Bob
C'est le conseil le plus utile des trois vidéos. Quand tu fais du lip sync avec une référence audio, inclus la transcription exacte des mots dans ton prompt en plus du fichier audio. Voici pourquoi.
Bob tested this with a clip of himself talking to camera. In his first attempt, he tagged the audio file and described the scene but did not include the exact words being spoken. The model listened to the audio and tried to replicate it, but got details wrong ("CGI 2.0" instead of "Seedance 2.0"). When he modified the prompt to explicitly spell out the words being said, the audio file combined with the written transcript produced dramatically better results. The lip sync was tighter, the words were accurate, and the overall performance was more convincing.
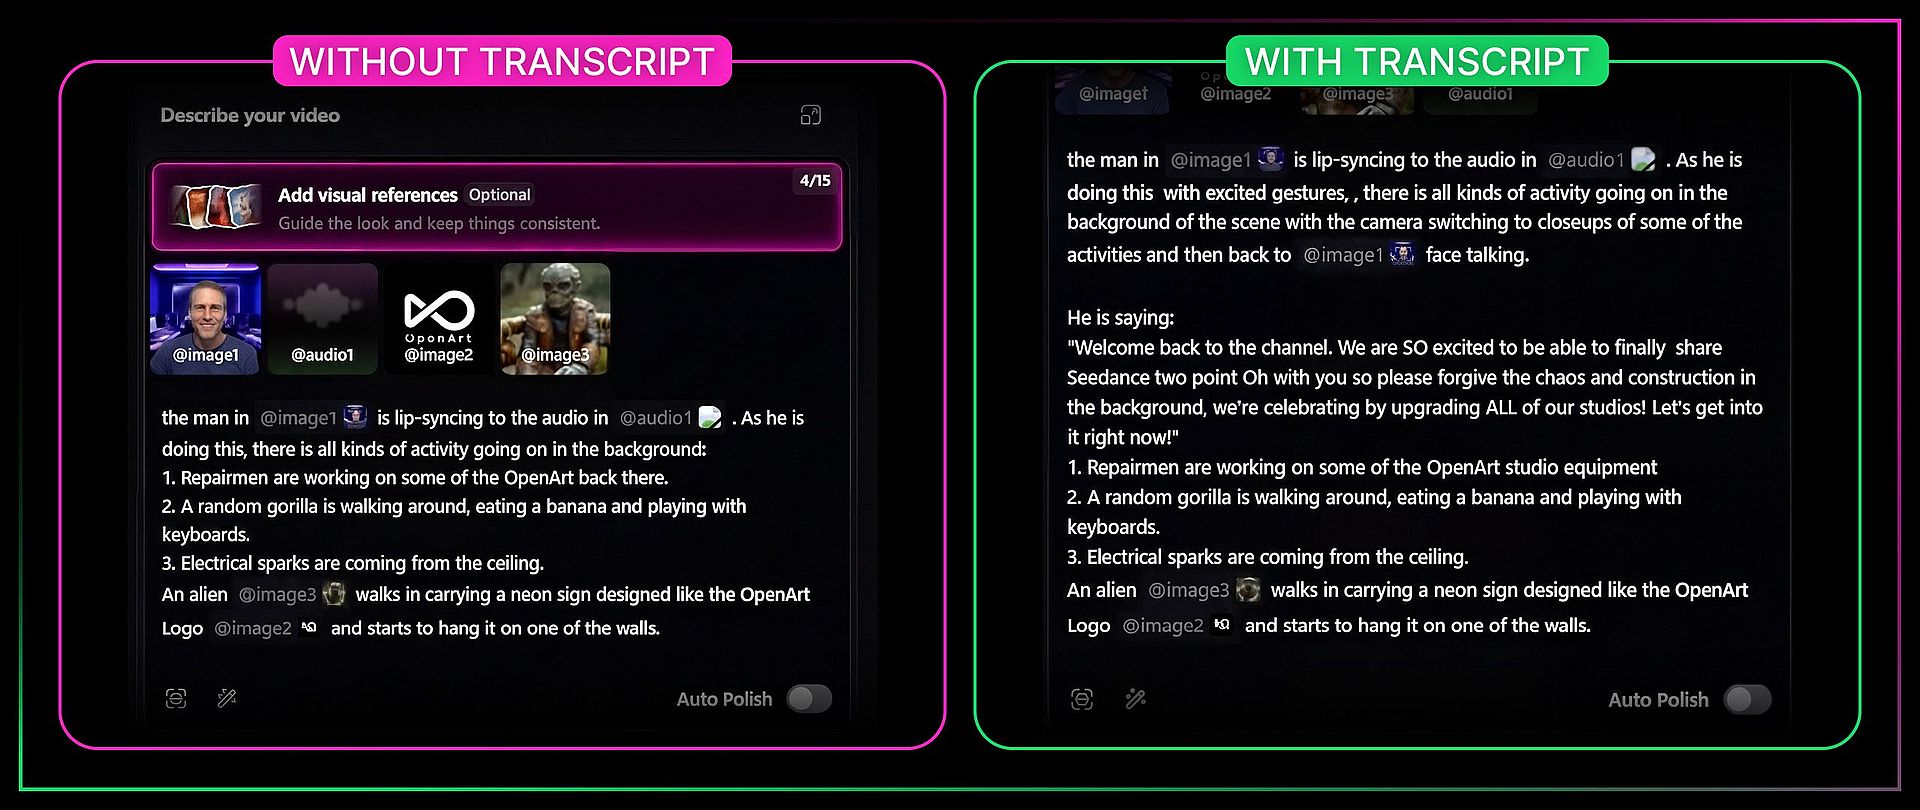
À retenir : chaque fois que tu fais du lip sync, fournis la transcription réelle avec le fichier audio. Tu es quasi assuré d'obtenir un meilleur résultat.
Fais correspondre la durée de ton audio à celle de ta vidéo
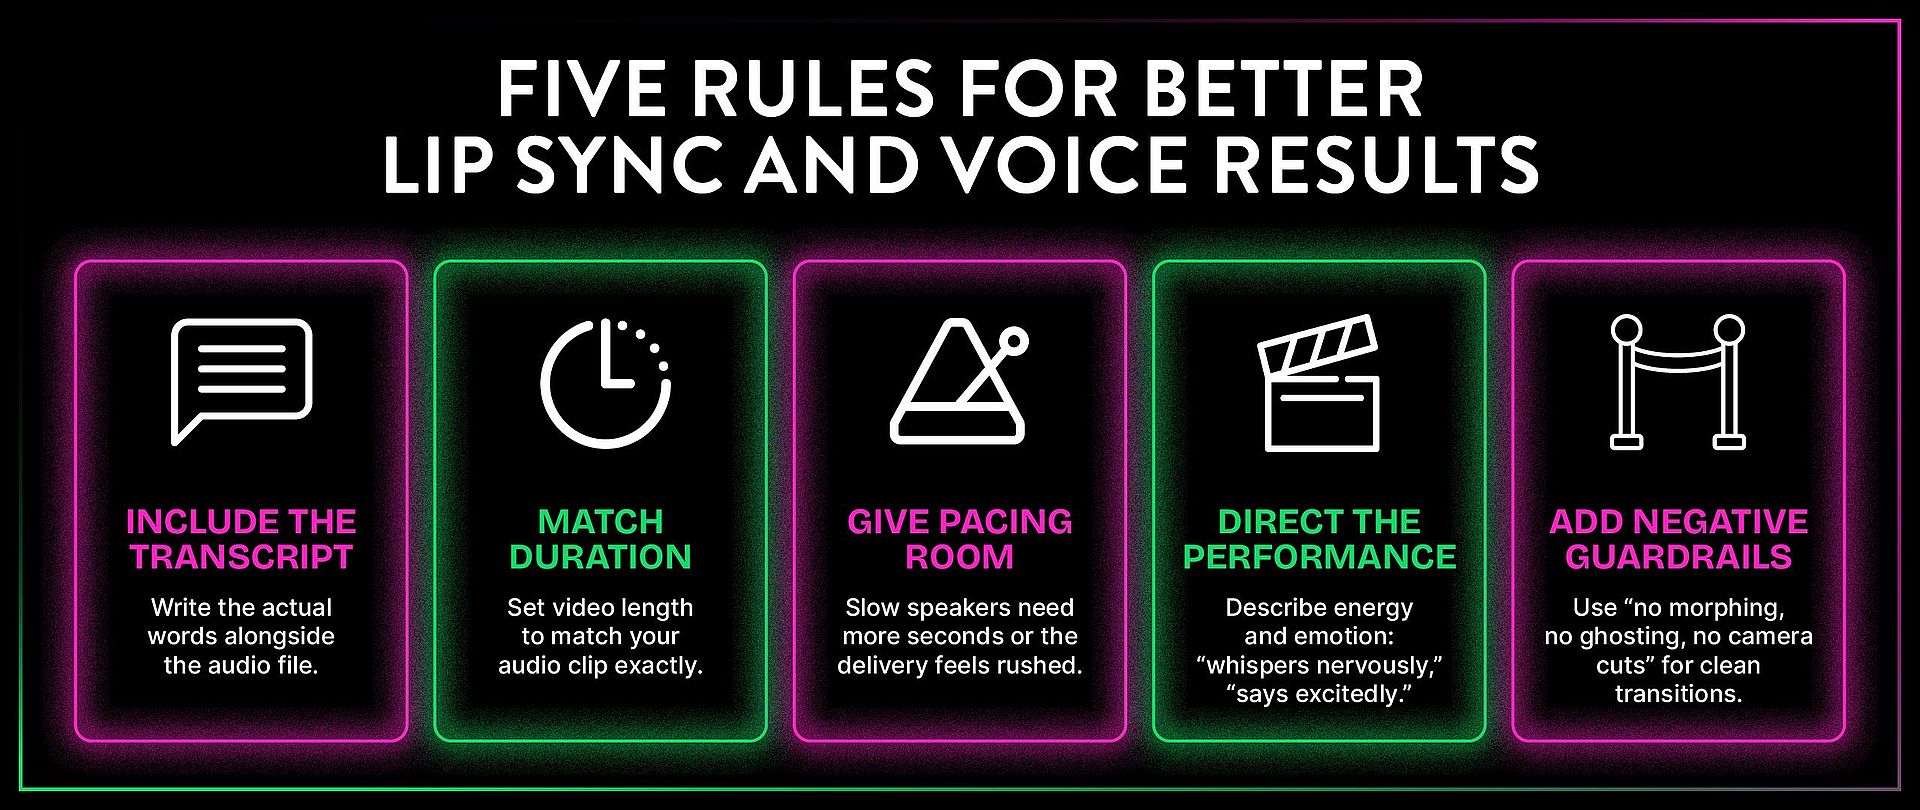
Mia l'a appris à ses dépens. Si ta référence audio dure 11 secondes et que tu règles la vidéo sur 15 secondes, le modèle est obligé d'étirer ou de compresser l'audio pour qu'il rentre, et tu perds presque à coup sûr le timing. Fais toujours correspondre le réglage de durée à la longueur réelle de ton fichier audio.
Clonage de voix
Bob a fait une démo de clonage vocal avec un clip de 15 secondes de la voix d'Ermin (Uncle Monz au bureau d'OpenArt). Le principe : enregistre environ 15 secondes d'une voix de façon à capter les qualités que tu veux reproduire. Tague cet audio comme référence vocale plutôt que comme source de synchronisation labiale. Puis écris le dialogue voulu dans le prompt, et le modèle génère un nouveau discours avec cette voix.
Le premier essai était trop rapide pour le débit naturel d'Ermin. Bob a donné au modèle 14 secondes complètes au lieu de 9, et le résultat ressemblait beaucoup plus à la façon dont Ermin parle vraiment. La leçon : le rythme compte autant que l'échantillon vocal. Donne au modèle assez de temps pour délivrer les mots à la bonne vitesse pour cette voix.
Tu peux réutiliser la même référence vocale sur plusieurs vidéos pour garder une voix cohérente pour un personnage.
Les conseils de Mia pour diriger la performance → 12:20 dans la vidéo de Mia
Mia a découvert qu'on peut diriger la performance émotionnelle et l'énergie d'un personnage via le prompt lui-même. Les mots que tu écris influencent la façon dont le personnage livre le dialogue, pas seulement ce qu'il dit. Si tu écris « il le dit avec enthousiasme », le langage corporel et l'énergie vocale du personnage changent. Si tu écris « elle chuchote nerveusement », toute la performance change.
Cela s'applique aussi à plusieurs personnages dans la même scène. Chez 11:10 dans la vidéo de Mia, elle montre comment donner à deux personnages des personnalités vocales et des états émotionnels différents dans un seul prompt, et le modèle les garde bien distincts.
Le conseil de Mia sur les garde-fous négatifs
Quand tu veux des transitions nettes d'une scène à l'autre sans morphing entre elles (par exemple, une narration sur quatre images différentes), Mia a appris à ajouter des garde-fous négatifs au prompt : « pas de morphing, pas de ghosting, pas de coupes de caméra ». Sans ça, le modèle mélange parfois les scènes de façons qui ressemblent à des glitchs visuels. Avec ces garde-fous, tu obtiens des transitions nettes d'une scène à la suivante.
Références avancées : mouvement, storyboards et style → 13:22 dans la vidéo de Mia · → Références vidéo de Bob
Une fois que tu comprends comment fonctionne le système de références pour les visages et les voix, voici ce que tu peux lui indiquer d'autre.
Transfert de mouvement et de caméra
Si tu as un plan où le mouvement de caméra te plaît, tu peux transférer ce mouvement vers une scène totalement nouvelle. Bob l'a démontré avec une vidéo d'un chien qui saute pendant que la caméra tournait autour de lui. Il a importé cette vidéo comme référence et a dit « utilise cette vidéo comme référence pour le mouvement de la caméra et du personnage afin de guider un épouvantail qui saute sur un trampoline ». Le résultat a transféré à la fois le travelling de la caméra et le mouvement de saut au nouveau personnage et à la nouvelle scène.
Il a aussi montré le transfert de mouvement avec de vraies séquences. En utilisant une clip d'Emily en train de courir à 19:15, il a dit « remplace la femme de la vidéo un par l'homme de l'image un et il neige ». Le modèle a échangé le personnage, ajouté un temps hivernal et conservé le mouvement de course intact. Certains détails d'arrière-plan ont changé (l'ambiance générale est devenue grise et hivernale), mais le mouvement principal a tenu.
Character Swap Split Screen LRB.mp4
Du storyboard à la vidéo → 13:22 dans la vidéo de Mia
Tu peux importer une grille de type planche de BD ou un storyboard, et le modèle tentera de l'animer case par case. Mia a testé ça avec une grille dessinée à la main et a constaté que le modèle suivait les cases dans l'ordre, mais que la logique directionnelle entre les cases n'était pas toujours évidente pour lui à partir des seuls visuels.
Deux astuces qui ont amélioré le résultat. D'abord, décris la logique narrative entre les cases dans ton prompt. Le modèle doit comprendre la progression de l'histoire, pas seulement la séquence visuelle. Ensuite, si ton storyboard contient du texte ou des légendes, ajoute « text overlay no captions on screen » au prompt pour éviter que le texte ne déborde dans la vidéo générée.
Mia précise aussi que tu peux utiliser de vraies pages de bandes dessinées pour ça, mais attention à tout ce qui touche à une propriété intellectuelle existante.
Références de style et réplication de templates → 14:45 dans la vidéo de Mia
Mia's template replication tip is a practical one for anyone producing content at volume. If you have a video with a visual style you like, you can reference it and tell the model to replicate just the style, not the content. She tested this by pointing to a video and saying she only wanted the fisheye lens effect and the flickering double-exposure look, then combined it with character images and outfit references to create a fashion sequence. The model picked up the abstract visual qualities without copying the specific content of the reference video.
C'est utile pour garder une identité visuelle cohérente sur une série de vidéos. Crée une vidéo qui te plaît, puis reprends son style pour toutes les générations suivantes.
Après la génération : étends et modifie → 16:06 dans la vidéo de Mia
Une vidéo n'est pas terminée une fois générée. Seedance 2.0 te permet de la prolonger, l'éditer et la réécrire après coup.
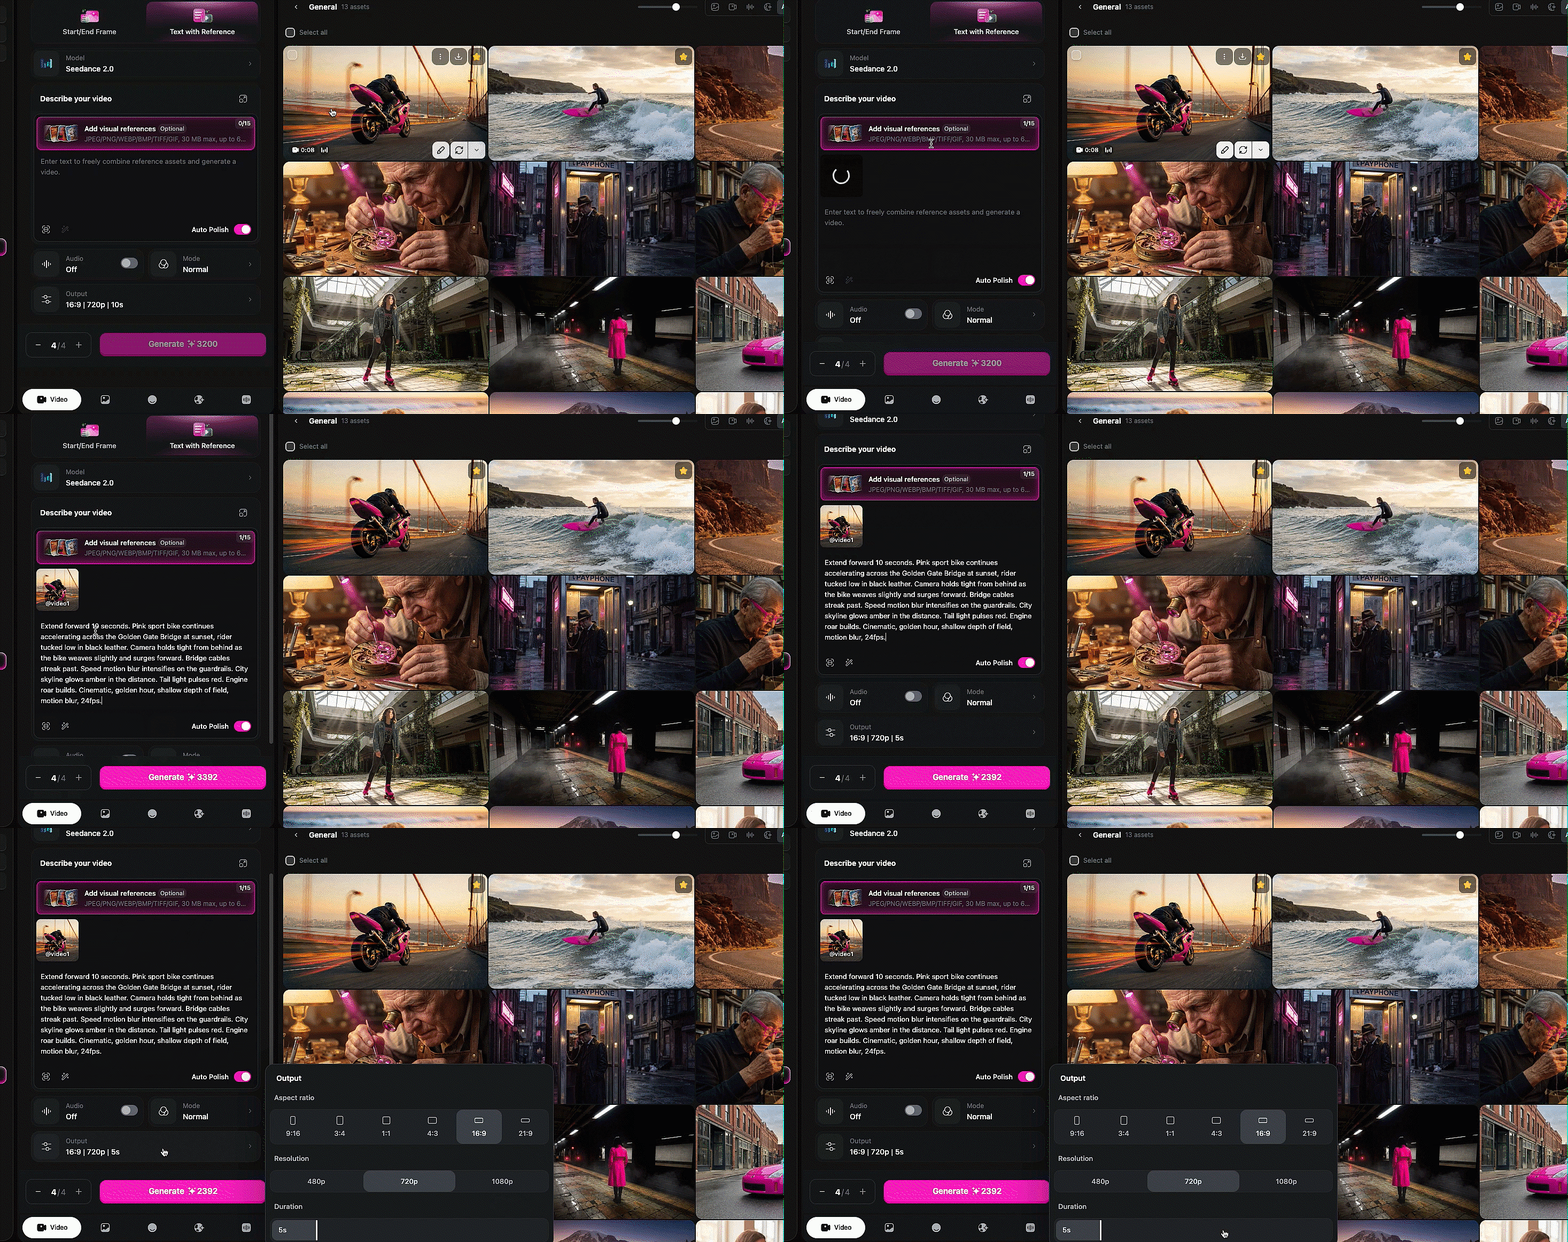
Étendre. Importe une vidéo que tu veux prolonger, choisis d'étendre vers l'avant (ou l'arrière), indique le nombre de secondes, ajuste ton réglage de durée en conséquence et décris ce que tu veux voir dans la nouvelle portion. Mia a prolongé une vidéo de 10 secondes vers l'avant, puis de 10 secondes vers l'arrière, et les a combinées en une scène fluide plus longue que la limite de 15 secondes par génération. C'est un vrai déblocage. La limite de 15 secondes était autrefois un plafond strict. Tu peux désormais construire des scènes fluides plus longues, sans coupures.
Modifier. Si tu veux modifier quelque chose qui s'est déjà produit dans une vidéo générée, tu peux dialoguer avec le modèle à propos de la vidéo existante et lui dire quoi changer. Ça fonctionne comme l'édition vidéo vers vidéo de Wan 2.7, mais avec la meilleure compréhension de Seedance 2.0 de ce qui se trouve dans la scène.
En résumé
Seedance 2.0 is the most capable video model available on OpenArt right now, and the reference system is the reason to pay attention. The ability to tag images, video, and audio into a single prompt and have the model hold consistency across all of them is not something any other model is doing at this level. The lip sync is strong. The voice cloning works. The motion transfer is clean. The coherent VFX generation, where lighting and effects actually interact with the scene physically, is new territory entirely.
Trois créateurs, trois vidéos, une conclusion partagée : ce modèle écoute. Il suit les prompts complexes et à éléments multiples mieux que tout ce qui existe. Le mieux à faire, c'est de te lancer et de commencer à lui demander ce que tu veux, parce qu'il a une imagination incroyable. Ce sont les mots de Bob, et il a raison.