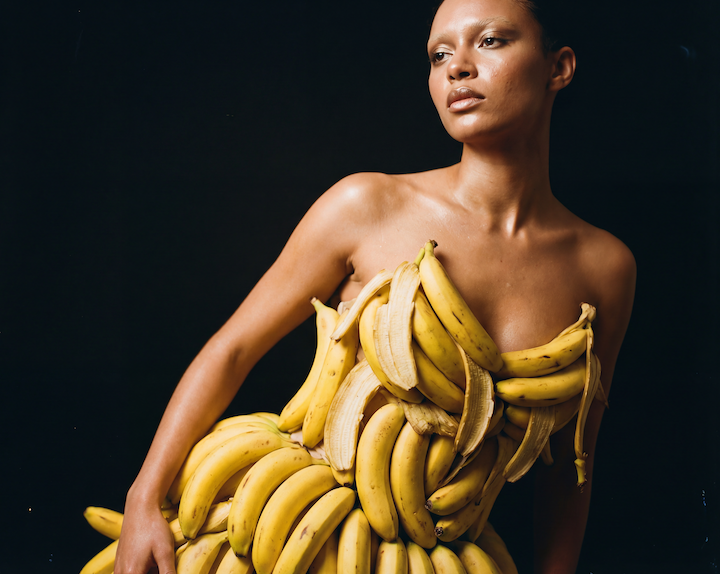
The Most Complete Guide to Stable Diffusion Parameters
Have you ever felt confused about the meaning of parameters such as CFG scale, seed, or negative prompt? You’ve come to the right place. In this guide, we will give you the most complete explanation of each parameter with clear examples. You might think you already know everything, but we guarantee you will learn something new. Let’s get started and unlock the full potential of Stable Diffusion with these parameters together.
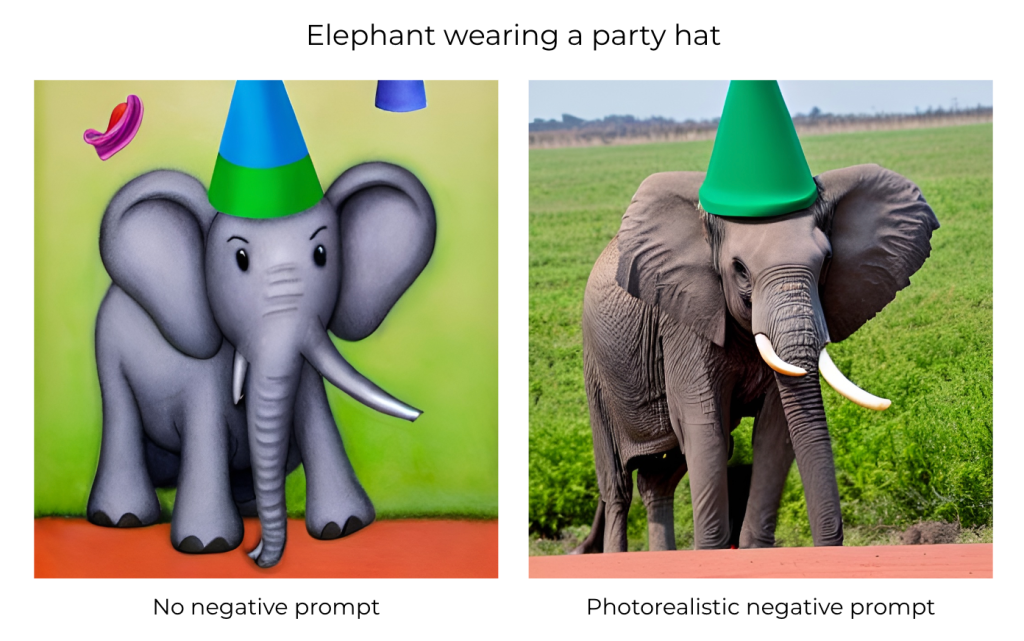
Negative Prompt
A negative prompt is exactly what it sounds like – it’s the opposite of a prompt. You input is what you DO NOT want Stable Diffusion to generate. This is a very powerful but underused feature of Stable Diffusion, and it can assist you in achieving results that would take way more time to reach by just tweaking the positive prompt.
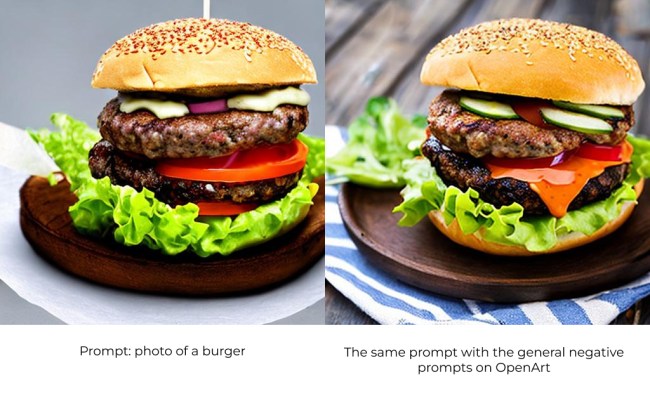
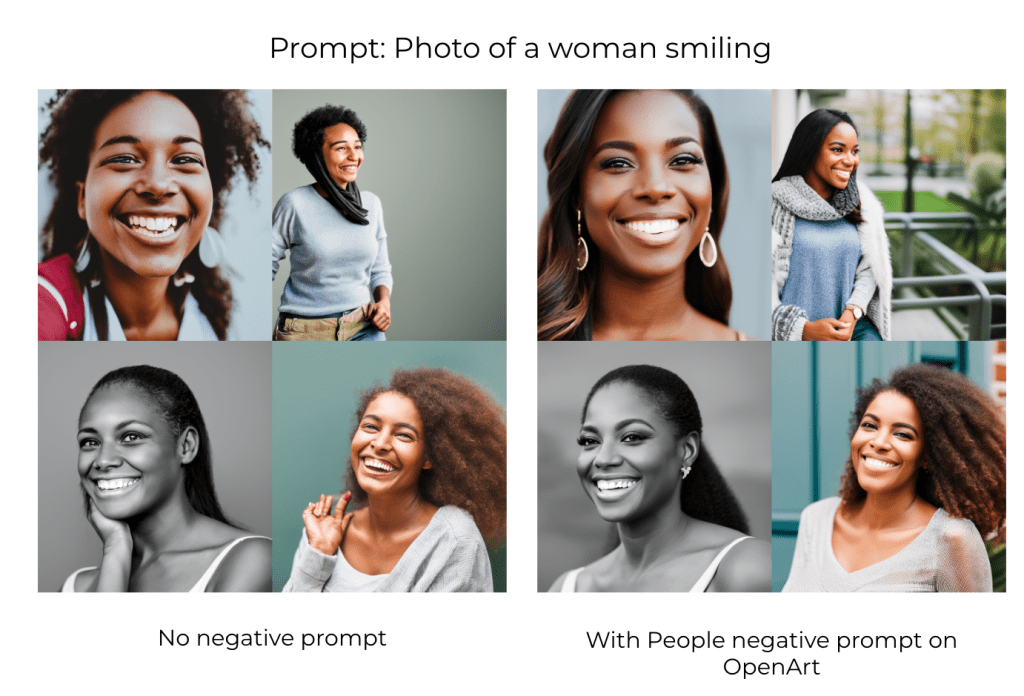
We know it can be hard to come up with negative prompts, so we have pre-curated negative prompts on https://openart.ai/create for you to easily choose from, here are some examples to demonstrate their effects.
General negative prompts: General: lowres, error, cropped, worst quality, low quality, jpeg artifacts, out of frame, watermark, signature
Negative prompts for people portraits: deformed, ugly, mutilated, disfigured, text, extra limbs, face cut, head cut, extra fingers, extra arms, poorly drawn face, mutation, bad proportions, cropped head, malformed limbs, mutated hands, fused fingers, long neck
Negative prompts for photorealistic images: Photorealistic: illustration, painting, drawing, art, sketch’
Steps
Stable Diffusion creates an image by starting with a canvas full of noise and denoise it gradually to reach the final output. This parameter controls the number of these denoising steps. Usually, higher is better but to a certain degree. The default we use is 25 steps which should be enough for generating any kind of image.
Here’s a general guide on what step number to use for different cases:
- If you’re testing a new prompt and want to have fast results to tweak your input, use 10-15 steps
- When you find the prompt you like, increase the steps to 25.
- In case you’re creating a face or an animal with fur or any subject that has detailed texture, and you feel the generated images are missing some of these details, try to bump it up to 40!
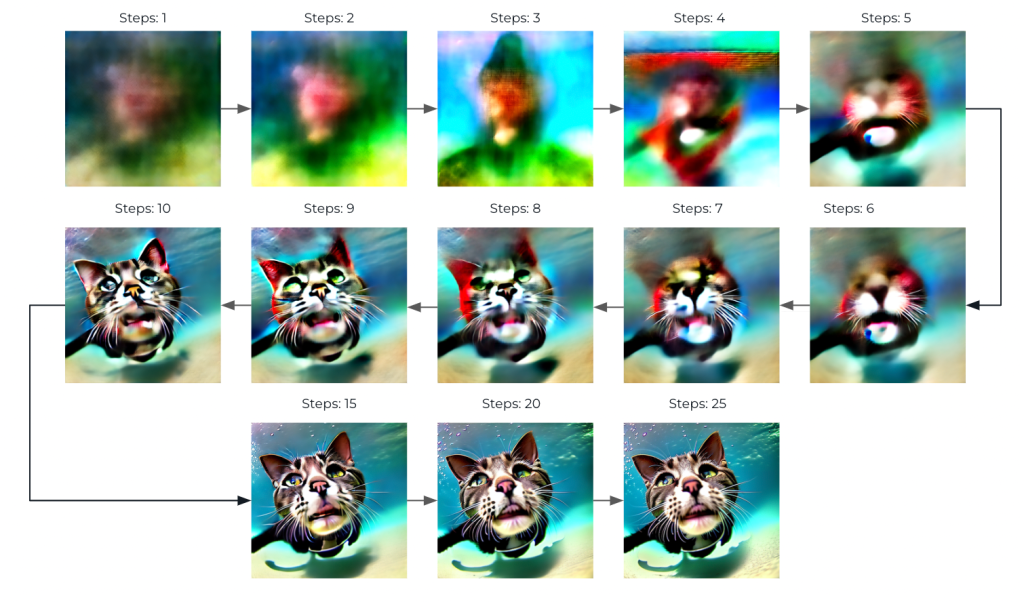
Some people are used to creating images with 100 or 150 steps, this was useful for samplers like LMS, but now it’s generally no longer needed with the improved fast samplers like DDIM and DPM Solver++, by using a high number of steps with these samplers you’ll probably be wasting your time and GPU power, without any increase in image quality.
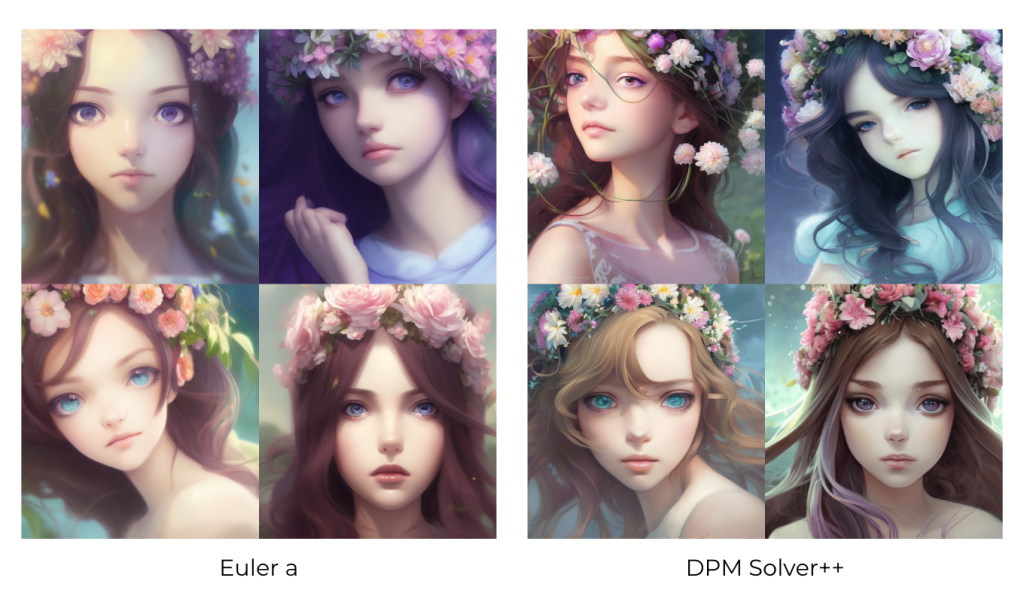
Samplers
As we mentioned before, Diffusion models work by denoising a starting noise canvas. This is where Diffusion samplers come to work. In simple terms, these samplers are algorithms that take the generated image after each step and compare it to what the text prompt requested, and then add a few changes to the noise till it gradually reaches an image that matches the text description.
On OpenArt we’ve implemented the three most used samplers by users, Euler A, DDIM, and DPM Solver++. You can try the three and see what fits your prompt better since there is no rule on what sampler to use, but these three are very fast and capable of producing coherent results in 15-25 steps.
There is only one noticeable difference between Euler a sampler and the other two that is worth mentioning, in this comparison you can see how Euler a results – compared to DPM Solver++– have smoother colors with less defined edges, giving it more of a “dreamy” look, so use Euler a if this is an effect you prefer in your generated images.
CFG guidance scale
This parameter can be seen as the “Creativity vs. Prompt” scale. Lower numbers give the AI more freedom to be creative, while higher numbers force it to stick more to the prompt.
The default CFG used on OpenArt is 7, which gives the best balance between creativity and generating what you want. Going lower than 5 is generally not recommended as the images might start to look more like AI hallucinations, and going above 16 might start to give images with ugly artifacts

So when to use different CFG scale values? CFG scale can be separated into different ranges, each suitable for a different prompt type and goal
- CFG 2 – 6: Creative, but might be too distorted and not follow the prompt. Can be fun and useful for short prompts
- CFG 7 – 10: Recommended for most prompts. Good balance between creativity and guided generation
- CFG 10 – 15: When you’re sure that your prompt is detailed and very clear on what you want the image to look like
- CFG 16 – 20: Not generally recommended unless the prompt is well-detailed. Might affect coherence and quality
- CFG >20: almost never usable
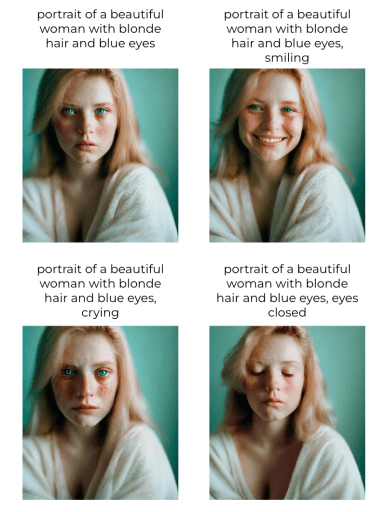
Seed
The seed is a number that decided the initial random noise we talked about previously, and since the random noise is what determines the final image, it is the reason you get a different image each time you run the exact same prompt on StableDiffusion systems like OpenArt, and why you get the same generated image if you run the same seed with the same prompt multiple times.
Since the same seed and prompt combo gives the same image each time, we can use this property to our advantage in multiple ways:
- Control specific features of a character: in this example, we changed the emotion, but this can also work for other physical features like hair color or skin color, but the smaller the change the more likely it will wor
- Testing the effect of specific words: If you wonder what a specific word is changing in the prompt, you can use the same seed with a modified prompt to test it out, it’s good practice to test prompts this way by changing a single word or phrase each time
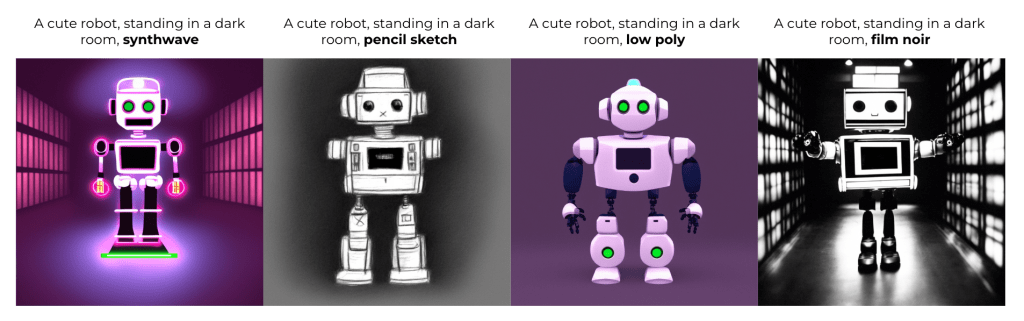
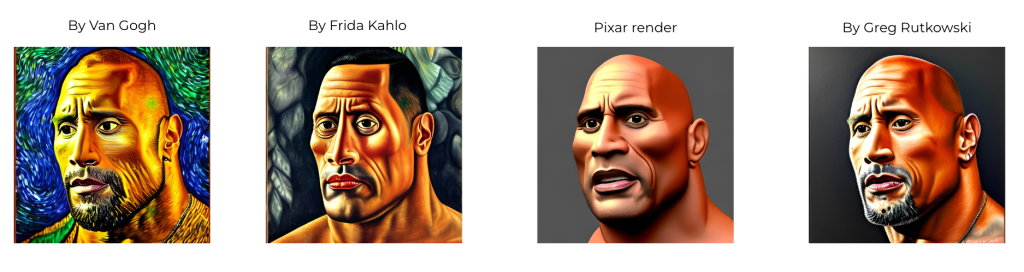
- Change style: If you like the composition of an image, but wonder how it would look in a different style. this can be used for portraits, landscapes, or any scene you create.
Img2img Parameters
The Img2img feature works the exact same way as txt2img, the only difference is that you provide an image to be used as a starting point instead of the noise generated by the seed number.
Noise is added to the image you use as an init image for img2img, and then the diffusion process continues according to the prompt. The amount of noise added depends on the “Strength of img2img” parameter, which ranges from 0 to 1, where 0 adds no noise at all and you will get the exact image you added, and 1 completely replaces the image with noise and almost acts as if you used normal txt2img instead of img2img.
So how to decide what strength to use? Here is a simple guide with examples:
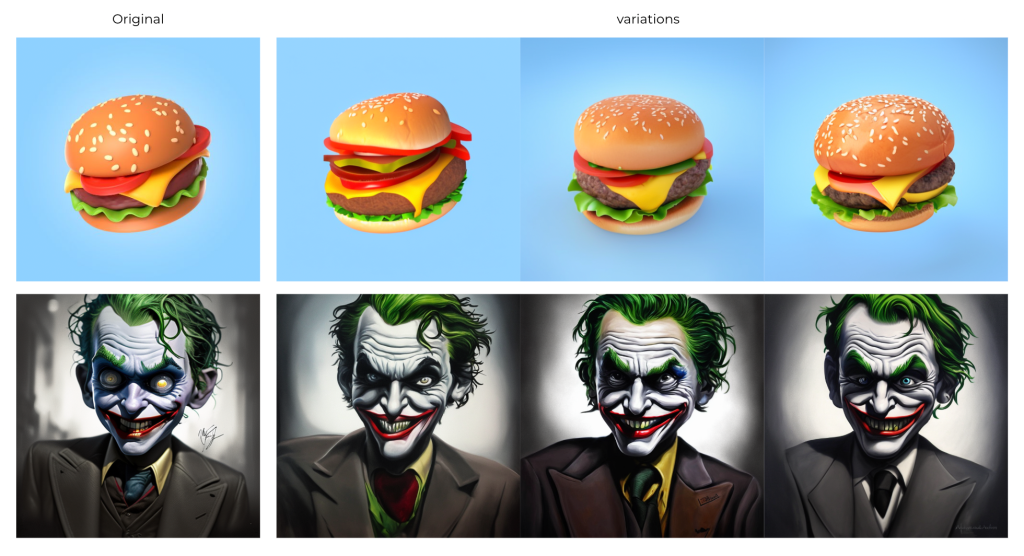
- To create variations of an image, the suggested strength to use would be 0.5-0.75 and with the same prompt. This can be useful when you like the composition of a created image but some of the details don’t look good enough, or you want to create similar-looking images to images you created in other software like blender or photoshop (in this case the prompt would be a description of the image).
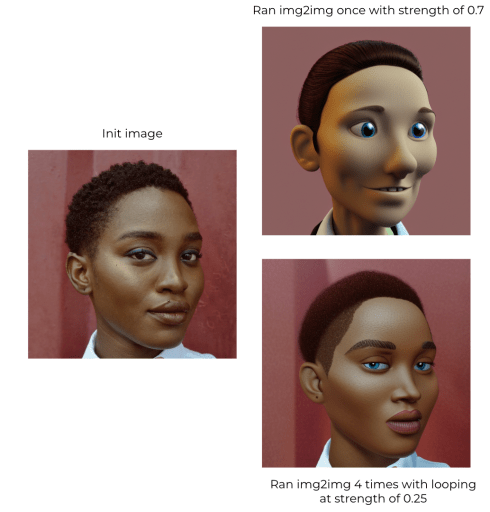
- To change an image style while keeping it similar to the original, you can use a lower-strength img2img multiple times, and get way better image fidelity compared to a single img2img with higher strength. For this example we used a strength of 0.25 for 4 times, so each time we generate the image we re-insert the generated image into the img2img and rerun it with the same prompt and strength till we get the style we need. If the same image was used in img2img with higher strength you would quickly lose image resemblance
Congrats on reaching this far! You now have a comprehesnive understanding of all Stable Diffusion parameters. If you would like to learn more about how to write better prompts, you can check out our Prompt Book. Definitely give it a try on creating some AI images on https://openart.ai/create.
This post is contributed by our community member Public Prompt, who is also the creator of http://publicprompts.art/.
Start creating on OpenArt!
In conclusion, mastering stable diffusion parameters is key for artists looking to push the boundaries of AI-enhanced creativity. This guide aims to equip you with the knowledge to finely tune these parameters, blending your artistic vision with the capabilities of AI. Remember, experimentation is your best tool. Each adjustment to the parameters is a step closer to perfecting your art. As you continue to explore and create, keep this guide as your reference and don't forget to sign up at Open Art for more insights, tools, and a community of like-minded creatives. Whether you're just starting or are looking to refine your skills, the journey of discovery and creation is endless.

.png)