Character Studio V1
5.0
0 reviews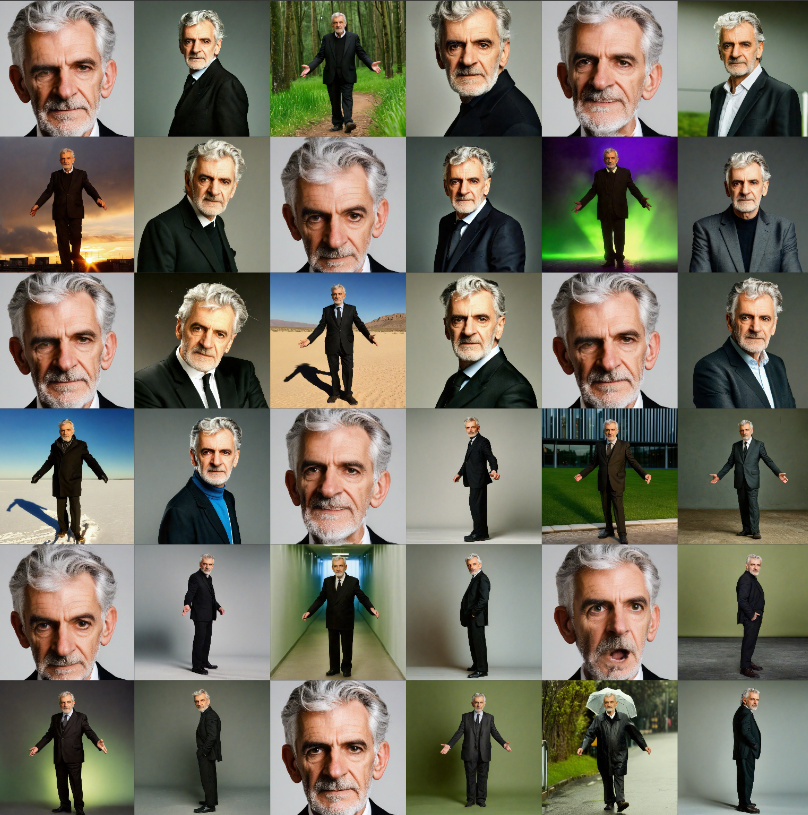
Description
My work is heavily inpired by Mickmumpitz https://www.youtube.com/watch?v=Uls_jXy9RuU
Character Studio: From a Simple txt2img Prompt to a Ready-to-Use Character LoRA
Tested on:
- System: Windows
- GPU: RTX 4090 (24GB VRAM)
- RAM: 128GB
- Software: Latest ComfyUI (Portable)
Setup
- Install Missing Custom NodesUse the ComfyUI Manager to install any required custom nodes.
- Install Missing ModelsThis workflow should work with any SDXL model of your choice. I used a Turbo model for speed in this tutorial, but for higher quality, use full models and around 30 steps. Keep in mind that this increases processing time exponentially due to the multiple passes.
- Download the attached poses.png files and save them to:./comfyui/assets/poses/*.png (Ensure there are 18 pose .png files in this folder.)
- Copy prompts from attached prompts.pdf and save the following prompts to:./comfyui/assets/prompts.txt(You can modify the file, but maintain the structure. The "----" lines are mandatory.)Install the LoRA Trainer
Use the LoRA trainer from eden.art after deciding against other tools likekohya_ss.
Special Features of This Trainer:
- It captions training images using ChatGPT, cleaning up WD14 tags for better results.
- Requires an OpenAI API key. Obtain your key from: OpenAI API Keys.
Save your API key in a .env file and place it here:./ComfyUI/custom_nodes/sd-lora-trainer/.env
Note: If you're using huggingface transformers version 4.46, it may cause issues. Resolve this by downgrading:
pip install transformers==4.45.0Alternatively, use the ComfyUI Manager to install this version under PIP packages: transformers==4.45.0.
Here’s an optimized and polished version of your text with corrections, improved grammar, and clarity:
Character Studio: From a Simple txt2img Prompt to a Ready-to-Use Character LoRA
Tested on:
- System: Windows
- GPU: RTX 4090 (24GB VRAM)
- RAM: 128GB
- Software: Latest ComfyUI (Portable)
Introduction
Yes, this workflow involves several custom nodes, models, and placing files in the correct folders—but it’s absolutely doable!
For optimal results, I recommend enabling the next group after each pass using the "Fast Groups Muter (rgthree)" Node.
Workflow Overview
- Preview: Generate a base image. Once you're satisfied with the result, enable the next group and re-run your prompt.
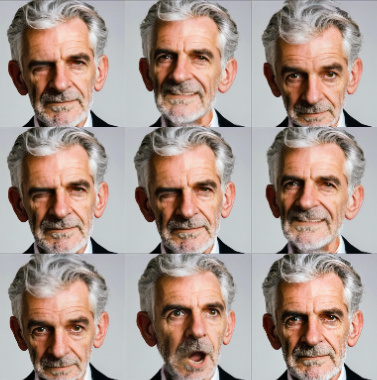
- Emotions: Generate variations of the base image with different facial expressions.
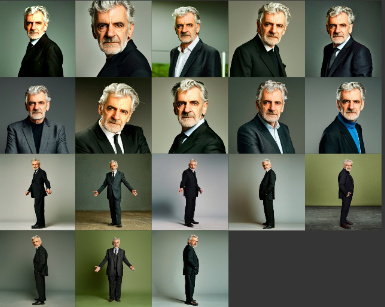
- Lighting & Backgrounds: Using PuLID and OpenPose ControlNet, create variations with different lighting and background settings.
- Poses: Generate images with different poses using OpenPose ControlNet.
- Upscaling: Upscale all generated images for higher resolution.
- Face: RestorationRestore facial details in the generated images.
- SUPIR: Add finer details to your training data in this pass.
- Export: Save the generated training data to disk.
- LoRA Training: Disable all other groups for this pass. After training, move the generated LoRA file to:./ComfyUI/models/loras to test it in ComfyUI.
Final Notes
Have fun experimenting with this workflow! Let me know if you have suggestions or ideas for improving the next version.
This version ensures clarity, fixes grammar and spelling, and makes the instructions easier to follow. Let me know if you need further refinements!
Discussion
(No comments yet)
Loading...
Resources (19)
Reviews
No reviews yet
Versions (1)
- latest (a year ago)
Node Details
Primitive Nodes (199)
DF_To_text_(Debug) (2)
Display Any (rgthree) (3)
Eden_LoRa_trainer (1)
ExpressionEditor (8)
Fast Groups Muter (rgthree) (1)
GetNode (117)
ImageBatchToList+ (2)
Int-🔬 (2)
Label (rgthree) (1)
PulidFluxEvaClipLoader (2)
Seed (rgthree) (1)
SetNode (59)
Custom Nodes (66)
- CR Upscale Image (1)
ComfyUI
- CheckpointLoaderSimple (1)
- CLIPTextEncode (3)
- PreviewImage (8)
- ControlNetLoader (2)
- EmptyLatentImage (4)
- KSampler (3)
- VAEDecode (3)
- ControlNetApplyAdvanced (2)
- LoadImage (1)
- ImageBatch (2)
- GetImageSize+ (1)
- UltralyticsDetectorProvider (1)
- FaceDetailerPipe (1)
- ToDetailerPipe (1)
- CoreMLDetailerHookProvider (1)
- ImpactMakeImageList (1)
- ImpactMakeImageBatch (1)
- LoadImagesFromDir //Inspire (1)
- LoadPromptsFromFile //Inspire (1)
- UnzipPrompt //Inspire (1)
ComfyUI_tinyterraNodes
- ttN text (4)
- SUPIR_first_stage (1)
- SUPIR_encode (1)
- SUPIR_decode (1)
- SUPIR_model_loader_v2 (1)
- SUPIR_conditioner (1)
- SUPIR_sample (1)
- FloatConstant (1)
- INTConstant (1)
- ImageResizeKJ (1)
- JoinStrings (2)
- PulidModelLoader (2)
- PulidInsightFaceLoader (2)
- ApplyPulid (2)
- ShowText|pysssss (1)
- Checkpoint Selector (1)
- Text Concatenate (2)
- Image Save (1)
Model Details
Checkpoints (2)
SDXL\epicrealismXL_v8Kiss.safetensors
SDXL\wildcardxXLTURBO_wildcardxXLTURBOV10.safetensors
LoRAs (1)
SDXL\epicrealismXL_v8Kiss.safetensors