2D to 3D Animation
5.0
0 reviewsDescription
Convert 2D cartoon animations into 3D Animations!
👉 CLICK HERE FOR THE VIDEO TUTORIAL 📹
What does this workflow?
A scene/clip of a 2D cartoon is converted into a 3D style animation.
The clip is 'unsampled' and transformed into noise. This noise, is then re-sampled using RAVE.
3 Controlnets (Lineart, Depth and Color) and the prompt assist the RAVE KSampler into making the animation resemble a 3D style animation.
Note: there is no conversion to 3D objects, but basically we convert the images into a 3D looking frames.
The workflow has in the notes specific instructions in how to run the workflow. My experience is that, depending on the clip used, some of the parameters need to be fine tuned to give improve the 3D appearance, minimize color leaching, avoid/minimize flickering and reduce the appearance of artifacts.
Thus, trial and error is needed, and some iterations may be needed. I provide some general guidelines how to have acceptable results. But by no means this is the only way (or the best way) to run the workflow. Moreover, there is a lot of improvement possible: this is a proof of concept of how some 2D animations could be 'remastered' using SD/ComfyUI.
Tips
Workflow development and tutorials not only take part of my time, but also consume resources. If you like the workflow, please consider a donation or to use the services of one of my affiliate links:
Help me with a ko-fi: https://ko-fi.com/koalanation
🚨Use Runpod and I will get credits! https://runpod.io?ref=617ypn0k🚨
😉👌🔥 Run ComfyUI without installation with:
RunDiffusion --> Use 'koala15' for 15% off in the first month!
How the workflow works
👉 CLICK HERE FOR THE VIDEO TUTORIAL 📹
STEP 0: Download Assets
If you are going to follow the tutorial, download the assets on the right. The woman on a bicycle is better downloaded from: https://www.videezy.com/people/7259-2d-cartoon-woman-on-bicycle
If you are going to use your local installation of ComfyUI or a VM/service, download the workflow via the 'Download' grey button. You will need to drag and drop the workflow json over the ComfyUI canvas.

If you are going to use OpeanArt.ai runnable workflow, click on the green button and wait until the machine is prepared

STEP 1: Preparation and KeyFrame Selection
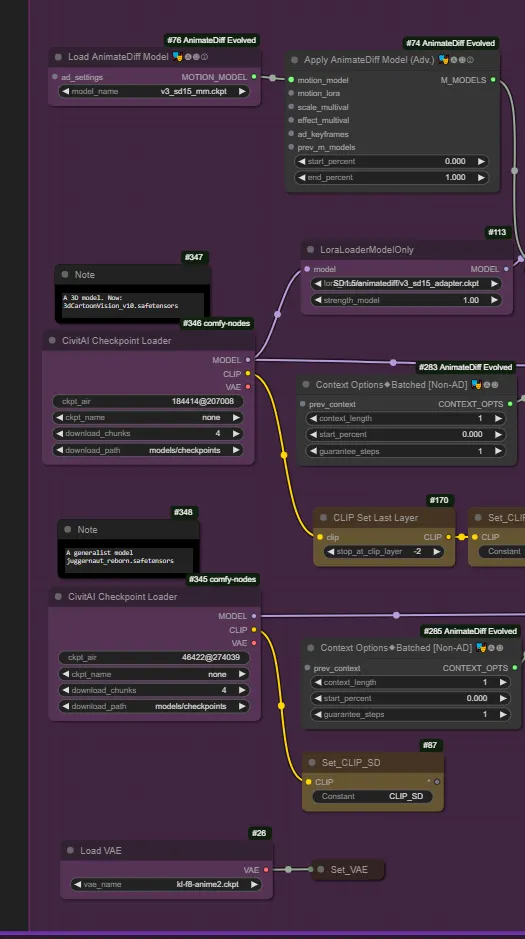
In this first step we load the models (Checkpoints, VAE, AD) - if different than in the example. We also need to load the video we want to convert into 3D, and set a width, cap frame limit (max. number of frames to process) and the frequency of frame extraction.
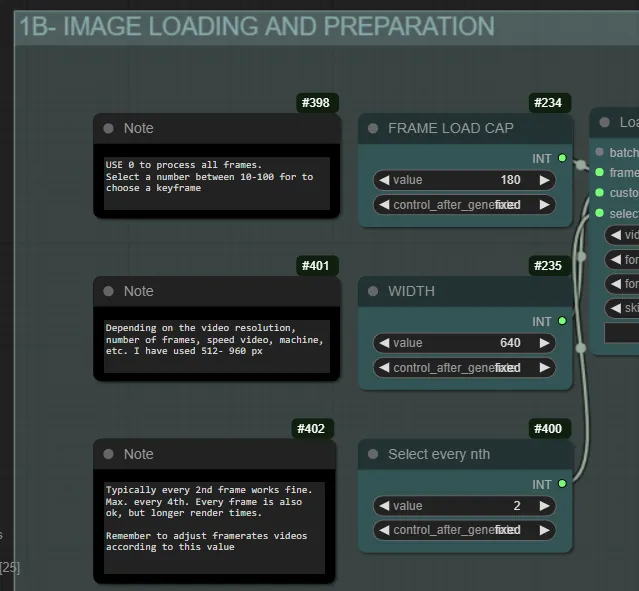
Width is set at 640 px for the runnable workflow to run in L4. If you download it and use it in a more powerful machine, you can use higher resolution (e.g. 960 px)
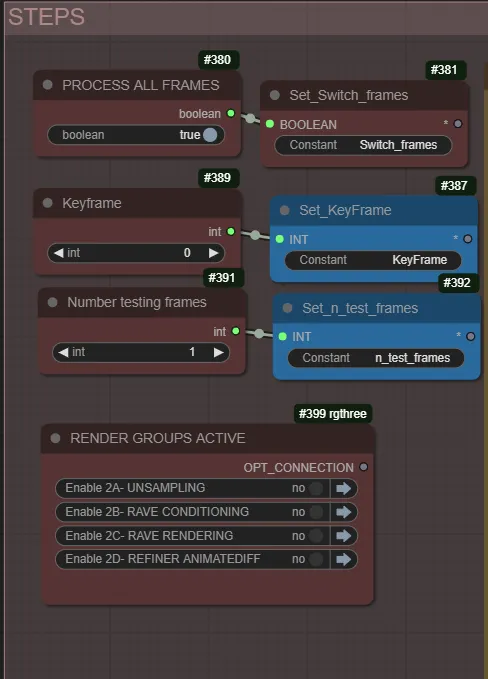
From the scene, we first want to choose one keyframe, which we will use later to fine tune the different settings. Therefore, we set to TRUE the switch "PROCESS ALL FRAMES", and set the processing of the Groups 2A/B/C/D to "FALSE".
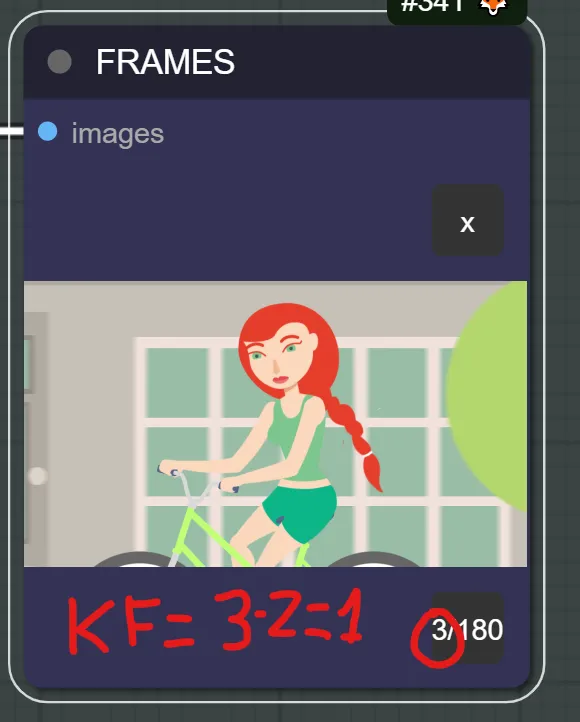
The frames from the video are extracted and, by inspecting them, we select which one we want to use for the refining in the next step. We take note of the number, but consider that in the next step we will need to rest 1 to this number (because of the indexing of the range node)
STEP 2: Tunning Reference KeyFrame:
We will only use the keyframe to see how the different settings will affect the animation. Therefore, first we indicate that PROCESS ALL FRAMES = false (so we do not process them all). Secondly, we indicate the Keyframe number (determined in Step 1), and set the number to 1. We finally activate the groups 2A/B/C/D, so the Keyframe is completely rendered and can be compared with the original one.
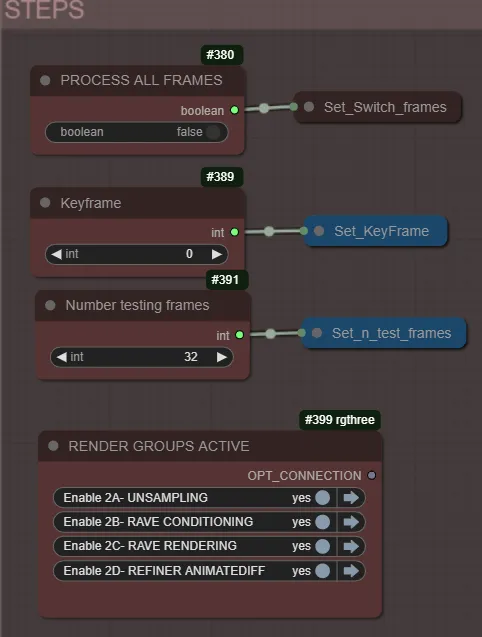
Idea of this step is to play with some key parameters, until we have transformed the keyframe to something we like. So basically we run the workflow, see the results, change 1 setting, run again, see results, etc.
Some guidance on the parameters, ranges, effects, etc are in the Notes in the Workflow

STEP 3: Tuning short animation Clip
Tuning only the keyframe is not enough. I recommend to first see what the results are when we run 10-12 frames, and probably refining a little bit the settings. A second re-run with 32 frames is also good to do, as this is 2 times the context window defined in AnimateDiff.
Only change "Number of Testing frames" to 10 (or 12, or a relatively small number). Then, run the workflow. Some refining of settings or additions to the prompt may be needed to get the results you want (hopefully not many).
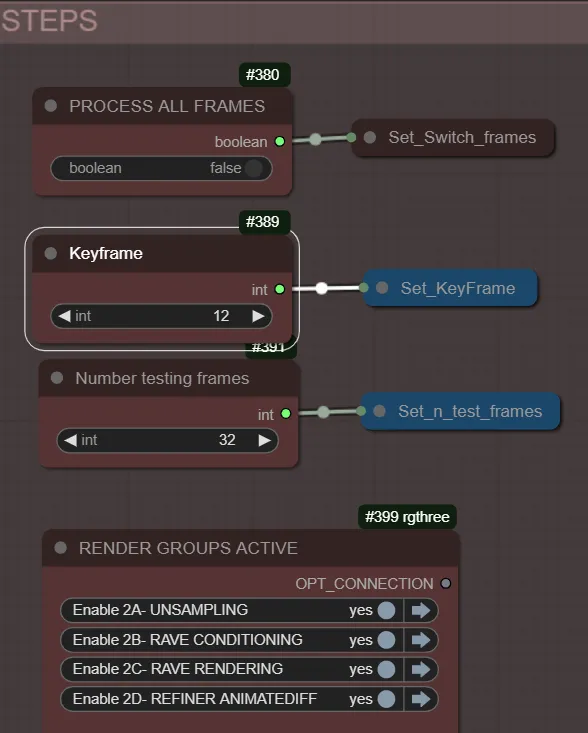
Rinse and repeat. Testing/refining with longer timeframes and/or different keyframes may also help when rendering the complete animation, but this is also time consuming, so sometimes best is to run the complete animation (STEP 4) and, if results are still not good iterate back to STEP 2.
STEP 4: Render complete Animation
If everything is good, we try to render the complete scene/clip.
To do it, set PROCESS ALL FRAMES to TRUE. This will override any value you have for keyframe and number testing of frames. Make sure the Groups 2A/B/C/D are all active.
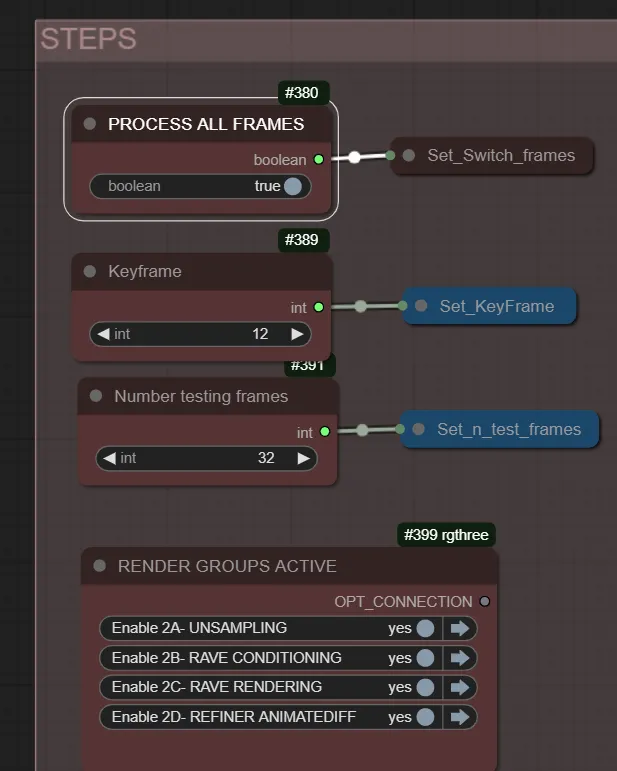
If the results of the complete rendering are good, congratulations! Remember to SAVE the animation by using the right option in Video Combine Nodes.
If the results still some additional refinement, first assess the result, and then determine what to do next. If the change is 'small', you may want to re-render the whole stuff. However, may be good to iterate to STEPS 3 or 2.
Runnable workflow specific instructions
- L4 can run, in 1 hour, not a large amount of frames (specially if they are big). Keep the cap limit to a reasonable number (e.g. 24), with a resolution of 960 px.
- Unloading of the models from Civit.Ai takes some time. Try to run it a first time until downloaded, then stop the instance and open a new one. I think the models will appear in the list, and then you can just select them and load (no need to download again). That will give you some more time to render the video.
- Models should either available in OpenArt or accessible via the Civit.Ai node included. Change them at your discretion, but use a 3D model for the 3D rendering!
- Set the preview mode to 'None' in the Manager to slightly speed up generations.
- If you are running out of time, you can save the workflow and load it again in a new machine. Rendering will start from the beginning, but at least you will have the latest settings.
Discussion
(No comments yet)
Loading...
Resources (2)
Reviews
No reviews yet
Versions (3)
- latest (2 years ago)
- v20240401-072517
- v20240331-182356
Node Details
Primitive Nodes (73)
Display Int (rgthree) (1)
Fast Groups Muter (rgthree) (1)
GetNode (21)
Note (17)
Primitive boolean [Crystools] (1)
Primitive integer [Crystools] (2)
PrimitiveNode (4)
Reroute (9)
SetNode (16)
Switch any [Crystools] (1)
Custom Nodes (49)
- ADE_LoadAnimateDiffModel (1)
- ADE_ApplyAnimateDiffModel (1)
- ADE_StandardStaticContextOptions (1)
- ADE_UseEvolvedSampling (3)
- ADE_BatchedContextOptions (2)
- CivitAI_Checkpoint_Loader (2)
ComfyUI
- SamplerCustom (1)
- CLIPSetLastLayer (1)
- VAELoader (1)
- PreviewImage (2)
- VAEDecode (2)
- CLIPTextEncode (4)
- VAEEncode (1)
- KSamplerSelect (1)
- FlipSigmas (1)
- BasicScheduler (1)
- KSamplerAdvanced (1)
- LoraLoaderModelOnly (1)
- GetImageSize+ (1)
- PixelPerfectResolution (1)
- ColorPreprocessor (1)
- AIO_Preprocessor (2)
- ACN_AdvancedControlNetApply (4)
- ControlNetLoaderAdvanced (4)
- KSamplerRAVE (1)
- VHS_VideoCombine (5)
- VHS_LoadVideo (1)
- GetImageRangeFromBatch (1)
- ImageConcanate (1)
Model Details
Checkpoints (0)
LoRAs (1)
SD1.5/animatediff/v3_sd15_adapter.ckpt